Safety first. The following information is for educational purposes. CNC machining involves high-speed rotating cutters. Always wear eye and ear protection, never leave a running machine unattended, and verify all feeds and speeds for your specific setup.
CNC router joinery is the discipline of cutting structural wood joints — finger joints, box joints, mortise and tenon, dovetails, dadoes, rabbets, cope-and-stick, tongue-and-groove — with a flat-bottoming endmill instead of a saw blade or a hand-cut chisel. On my Shapeoko Pro the trade is simple: I give up the speed of a dedicated joinery jig and I get back near-perfect repeatability, joints that index off the same datum every time, and the ability to cut a joint geometry a router table physically cannot reach. Done right, a CNC-cut joint closes with hand pressure and zero gap. Done wrong, it is loose, burned, or blown out at the exit edge — and the cause is almost always the same three things.
I have cut every joint on this page across the machines I run, in hardwood, ply, and MDF, and the lessons below are the ones that took me the most broken bits and ruined stock to learn. This guide is the map; each linked spoke is the deep dive on one joint. If you take one idea away, make it this: on a CNC, joinery is a workholding and tool-diameter problem first, and a “which joint looks nice” problem a distant second.
Why Cut Joinery on a CNC Router at All?
You cut joinery on a CNC when you need repeatability and indexing more than raw speed. A router table cuts a box joint faster than my Shapeoko ever will — but the 30th finger off the CNC is dimensionally identical to the first, referenced to the same X-Y zero, with no jig drift. That is the whole value proposition.
The crossover where CNC wins is when the part count climbs, when the joint has to land in an exact location relative to other features (a mortise 12mm from a dog hole), or when the geometry is awkward for a fence-and-jig setup — angled dovetails, blind mortises, curved dadoes. The crossover where the CNC loses is a single quick joint in thick stock: the saw or the chisel wins on time every time. I treat the router as the structural backbone of the shop — the same machine that cuts a turntable plinth or a sim-rig brace cuts the casework joinery — not as a faster table saw.
The Three Things That Decide Every CNC Joint
Across every joint I cut, the outcome comes down to three variables, in order: workholding, tool diameter, and the dogbone/fillet problem. Get these three right and the joint type almost doesn’t matter.
1. Workholding. A joint cut into a part that shifted 0.3mm mid-cut is scrap. Thin rails and small parts are the worst offenders. I clamp off the joint path, use a sacrificial fence to register repeat parts, and for thin stock I reach for double-stick tape or painter’s-tape-and-CA before I trust a single toe clamp. The full logic lives in my CNC workholding guide, and for the parts too small to clamp I default to the painter’s tape and CA glue method.
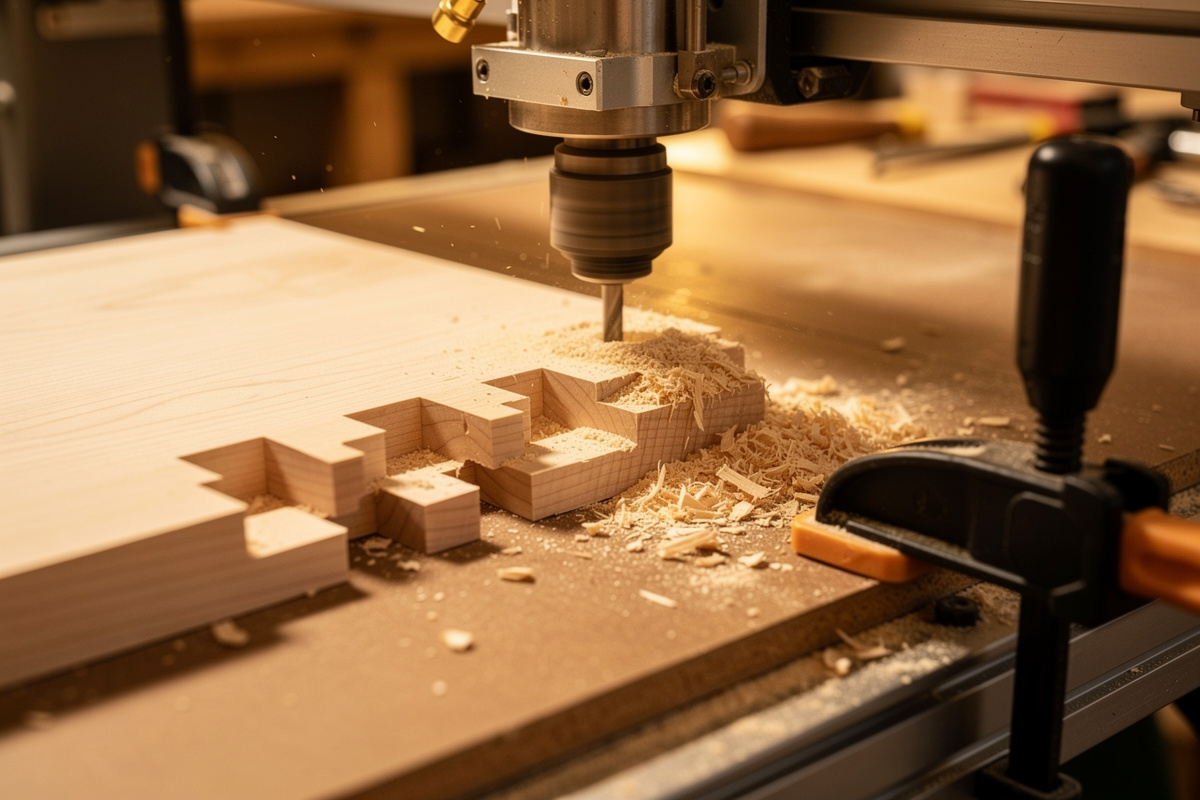
2. Tool diameter. The endmill diameter sets your minimum internal corner radius. A 6mm bit cannot cut a sharp 90° inside corner — it leaves a 3mm radius. That radius is what stops two mating parts from seating fully, and it is the single most common reason a beginner’s box joint won’t close. You either size the bit small, add a relief, or design the mating part to clear the leftover radius.
3. The dogbone/fillet. Because of that radius, CNC joinery lives or dies on corner relief. A dogbone or T-bone fillet removes material past the corner so the mating part drops in flush. Every tight-fitting CNC joint on this page uses one. Skip it and the joint binds on the radius, not the face.
Dogbone vs T-bone: Which Relief and Where
The two reliefs solve the same problem differently. A dogbone fillet drills a small circle diagonally outward into the corner — it clears the radius and is invisible from the show face because it sits in the inside corner. A T-bone fillet pushes the relief sideways into one wall instead of diagonally, which keeps the relief off a visible edge and is what I use when a joint face will be seen. My rule: dogbone for hidden joinery and jigs where I don’t care about the tiny circle, T-bone whenever the relief would otherwise scar a show surface, pushed into the part that gets covered. CAM packages generate both automatically — the mistake is forgetting to apply them at all, then wondering why a perfectly dimensioned box joint won’t seat.
The relief diameter has to be at least your bit diameter, and I add a few thousandths of clearance so the mating part never touches the relieved corner. On a 1/4″ bit that means a fillet that reaches roughly 0.13″ past the theoretical corner. Get this wrong by under-sizing and you are back to a joint that stands proud on the radius; over-size it and you start weakening the corner. It is the most mechanical part of CNC joinery and the one beginners skip most.
Which Bits Cut Clean Joinery
For joinery I run straight-flute and compression bits almost exclusively, not the spiral upcuts I use for general pocketing. The reason is edge quality: a joint’s appearance and fit both depend on a crisp, splinter-free shoulder, and that is exactly where upcut bits lift and fuzz the top edge.
My default joinery shelf: a 1/4″ compression bit for through-cuts in ply where I need a clean top and bottom edge, a 1/8″ straight or downcut for fine fingers and detail, and a 60° or 90° V-bit for the chamfered lead-ins on cope-and-stick. A downcut bit pushes chips down and leaves a glass-clean top surface — perfect for the visible face of a finger joint. I break down the full reasoning in my downcut vs upcut comparison and the broader CNC router bits guide. For the diameter math behind corner radius, the end mills reference is the page I send people to.
The Joints Compared: Strength, Difficulty, and Where Each Wins
Not every joint belongs on a CNC, and not every joint suits every project. Here is how I rank the seven I cut most, by glue-surface strength, how fussy they are to dial in on the machine, and the typical job each one earns its place on.
| Joint | Relative strength | CNC difficulty | Best use | Key bit |
|---|---|---|---|---|
| Mortise & tenon | Very high | Medium | Tables, chairs, frames | 1/4″ straight/compression |
| Dovetail | Very high (mechanical) | High | Drawers, fine boxes | 14° dovetail bit |
| Finger (comb) | High | Low–medium | Boxes, drawers, casework | 1/8–1/4″ straight |
| Box joint | High | Low | Small boxes, jigs | 1/4″ straight |
| Dado / rabbet | Medium | Low | Shelving, cabinet backs | 1/4–1/2″ straight |
| Cope & stick | Medium | High | Cabinet doors, frames | V-bit + straight |
| Tongue & groove | Medium | Low | Panels, flooring, backs | 1/4″ straight |
Strength here is glue-surface and mechanical interlock combined — a dovetail resists pull-apart mechanically even before glue, which is why drawer fronts use it. A dado is weak in pull-out but plenty strong for a shelf carrying static load. Match the joint to the failure mode the part will actually see, not to which one looks most impressive.
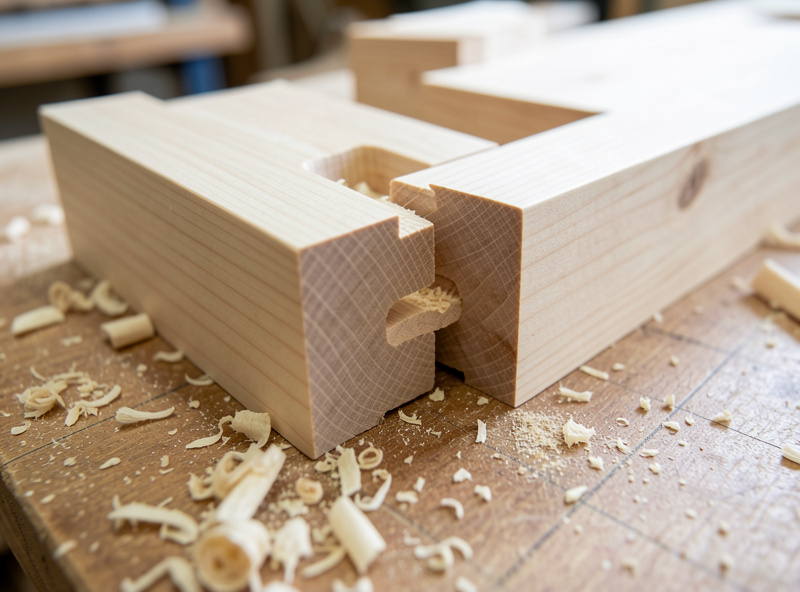
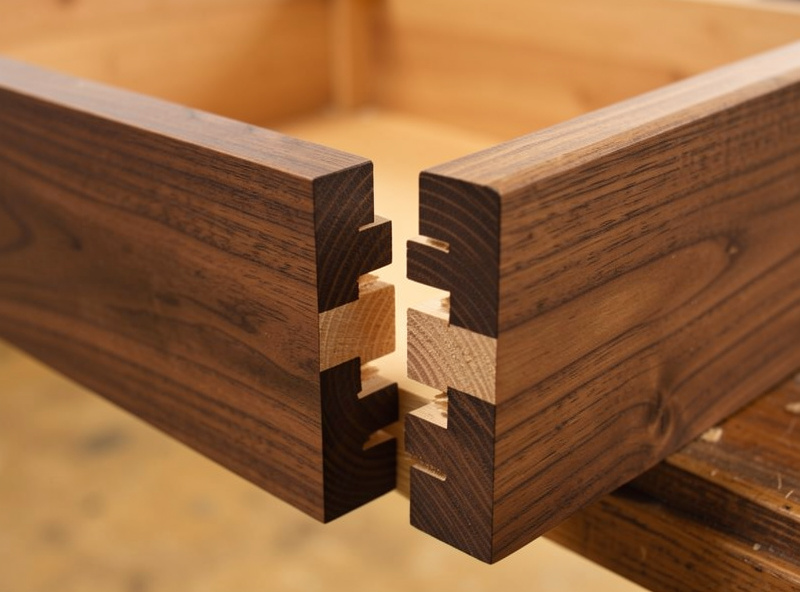
Finger Joints and Box Joints
Finger joints (and their square-fingered cousin, the box joint) are the joints I start every beginner on, because the CNC version is far more forgiving than hand-cutting and the failure modes are easy to read. A row of interlocking fingers gives you huge glue surface and the parts self-register during glue-up.
The whole game is the fit between finger and slot. I cut a test pair first, measure the gap, and adjust my fit allowance — I aim for a finger that taps home with a soft mallet, not one I have to fight. A hair too tight splits on glue-up; a hair too loose telegraphs every gap. The square-fingered box joint is the same idea with straight-walled fingers, and it wants dogbone fillets even more than the comb finger joint does — both detailed in their own dedicated walkthroughs — the CNC finger joints walkthrough and the CNC box joints walkthrough.
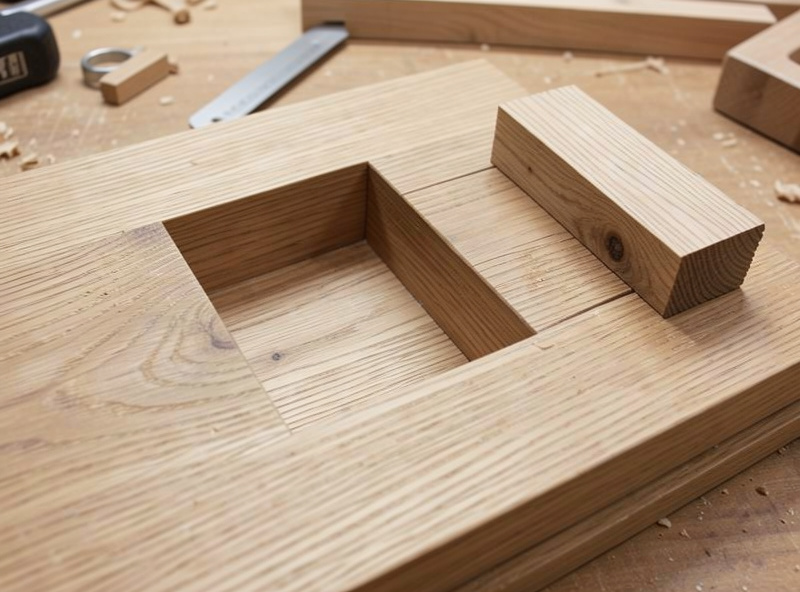
Mortise and Tenon
The mortise and tenon is the strongest general-purpose frame joint there is, and the CNC makes the historically hard half — a clean, square-bottomed mortise in an exact location — almost trivial. I pocket the mortise with a 1/4″ bit, accept the rounded corners the bit leaves, and then either round the tenon to match or square the mortise corners with a chisel depending on whether the joint shows.
The subtlety is the tenon. You can cut the tenon on the CNC too, but I often cut mortises on the machine and tenons on the table saw — the saw is faster for the simpler tenon geometry, and the mortise is where CNC precision pays off. The round-tenon-to-fit-round-mortise trick that skips chisel work entirely is the one I lean on most, and the full method is in the CNC mortise and tenon spoke. This is the joint I reach for on anything that has to carry a load through a frame — tables, chairs, the casework that holds the rest of the shop together.
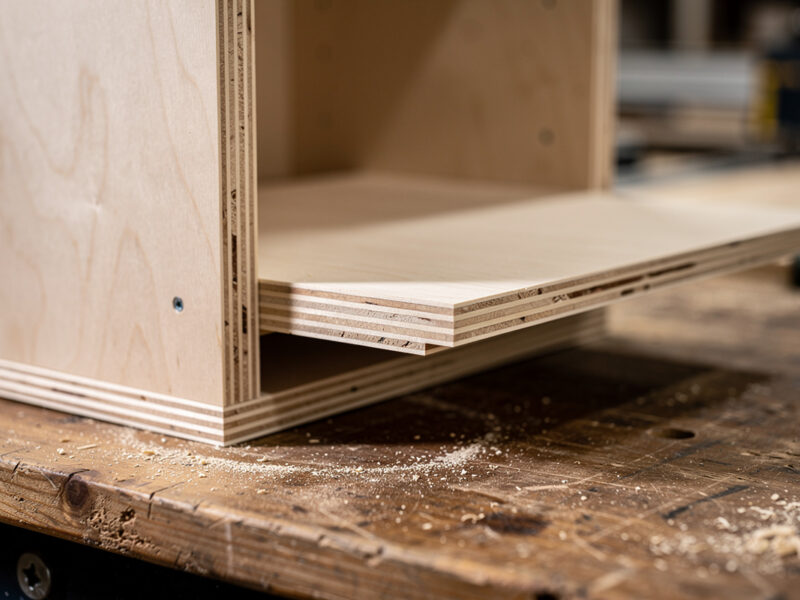
Dadoes, Rabbets, and Grooves
Dadoes and rabbets are the workhorse joints of casework — the slots that hold shelves, the recesses that capture a cabinet back. On the CNC they are the easiest joints on this page: a straight slot at a set depth, cut with a bit sized to your stock thickness (or cut in two passes for an exact fit). The catch is that real plywood is almost never its nominal thickness, so I measure the actual sheet and cut the dado to match, not to the label.
A rabbet is just a dado at the edge of the board, and a groove is a dado that runs with the grain. The CNC’s advantage here is stopped dadoes — a slot that ends partway across the panel with a clean, flat-bottomed stop, which is fussy to cut any other way. The two-pass exact-fit method, and why I climb-cut the final pass for a cleaner wall, get the full treatment in the dado and rabbet spoke.
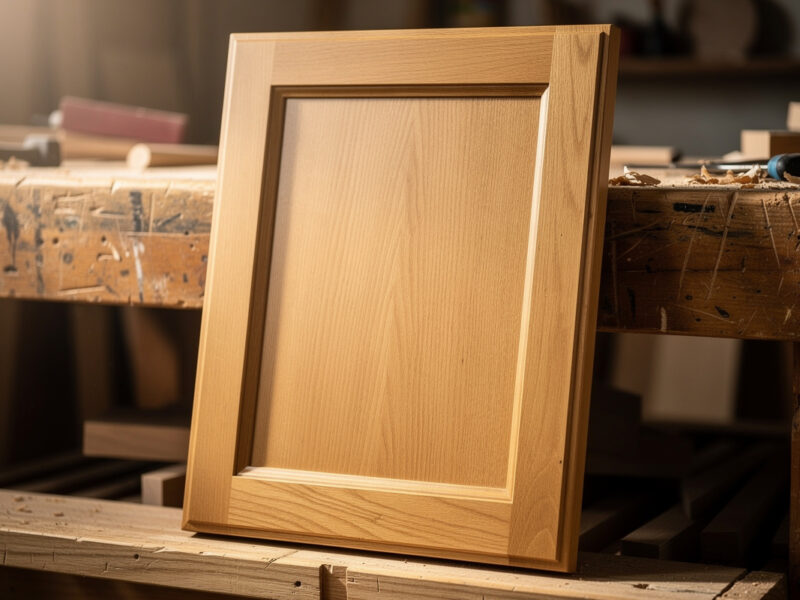
Cope and Stick Cabinet Doors
Cope-and-stick is the frame-and-panel joint that makes a real cabinet door — a profiled rail-and-stile frame capturing a floating panel. On a router table you need a matched bit set and you flip the workflow between stick (the profile and groove) and cope (the matching end cut). On the CNC I cut the whole profile as a toolpath, which means I am not buying a $120 matched bit set and I can tune the profile to whatever I want.
This is one of the harder joints to dial in because the cope and stick profiles must mate exactly — any mismatch shows as a gap right at eye level on a finished door. I cut test corners until the profile meets cleanly, then run the set. The full toolpath strategy, panel-groove sizing, and how I handle the floating panel’s seasonal movement are covered in the cope and stick cabinet doors spoke.
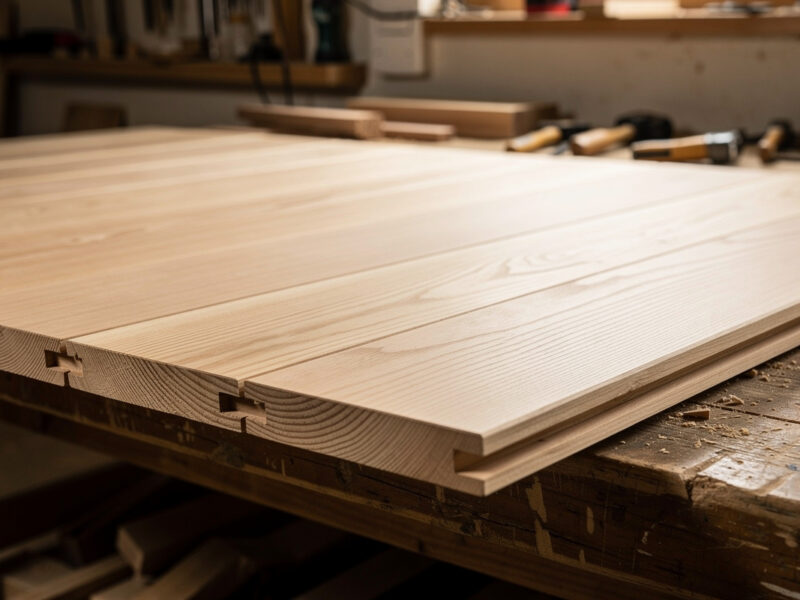
Tongue and Groove
Tongue and groove is how you join boards edge-to-edge into a panel that stays flat — flooring, cabinet backs, wide tabletops, shiplap. The tongue on one board drops into the groove on the next, the joint hides seasonal movement, and the glue surface keeps the panel from cupping. On the CNC I cut both halves as mirrored profiles and the fit is repeatable across a whole stack of boards.
The trick is leaving the tongue slightly loose, not press-fit — wood moves, and a tongue glued in tight along its whole length will crack the groove wall in winter. I size mine for a snug slip fit and glue only the shoulders. The full edge-jointing method and the loose-tongue spacer trick get their own tongue and groove walkthrough.
Fit Allowance: The Number Every Joint Needs
Every joint that has to mate has a fit allowance — the deliberate gap you build in so the parts assemble without splitting or sliding loose. This is not slop; it is the difference between the cutter’s actual path and the nominal joint dimension, and it changes with the material, the bit, and the machine’s real-world accuracy.
On my Shapeoko Pro cutting hardwood, I start finger and box joints with a fit allowance around 0.1mm per mating face and adjust from a test cut. Ply runs looser because the surface fuzzes; dense hardwood runs tighter because it splits less forgivingly. The reason I cut a test pair every single time is that the same CAM file gives a different real fit in maple than in baltic birch — the wood’s hardness, the bit’s runout, and even how recently I trammed the machine all move the number. Write the allowance that worked down next to the project; that is what a “test log” actually is, and it is why my second box in a given wood goes straight to good parts.
One subtlety that bites people: fit allowance compounds. A box joint has many mating faces, so a tiny per-face error multiplies across the joint and the box won’t square up. Tongue-and-groove and dado joints have one or two faces and forgive far more. The more mating surfaces a joint has, the more your test cut matters.
How the Material Changes the Joint
The same joint behaves differently in different stock, and ignoring that is how good toolpaths produce bad parts. Hardwood holds a crisp shoulder and takes a tight fit, but it burns if the bit dwells and it splits if the fit is too aggressive — I keep the feed up and the allowance honest. Plywood fuzzes at the cut line and lies about its thickness, so I run a compression bit for clean top-and-bottom edges and measure the actual sheet before cutting any dado. MDF machines beautifully and holds detail, but it has no long-grain strength, so a dado or mortise in MDF needs glue surface to compensate for the weak fibers — I never trust a press-fit alone in it.
Grain direction matters too. A mortise cut across the grain has stronger walls than one cut with it; a tongue-and-groove running long-grain to long-grain is structurally sound, but the same joint short-grain will snap. None of this is CNC-specific — it is woodworking — but the CNC’s repeatability tempts you to forget that the wood still gets a vote. The machine cuts the same path every time; the material does not respond the same every time.
Dovetails
The dovetail is the showpiece — the angled-pin joint that mechanically locks a drawer front to its sides and reads as proof the maker knows their craft. Cutting it on a CNC is the most technically demanding joint here, because a standard 3-axis machine cannot cut the undercut angle with a normal endmill. You cut dovetails with a dedicated dovetail bit (a downward-flaring cutter) and a toolpath that respects the geometry the bit’s angle creates.
I cut sliding dovetails routinely on the machine — a tapered sliding dovetail for a shelf-to-side joint is one of the strongest connections in the shop. True through-dovetail pins-and-tails are possible but fussier, and for fine drawer work I will be honest: a dedicated dovetail jig is often faster and cleaner than fighting the CNC toolpath. Where the CNC wins is the sliding dovetail and any dovetail that has to index to other machined features. The full toolpath, bit-angle, and jig-vs-CNC honest take is the subject of the CNC router dovetail spoke.
My CNC Joinery Workflow, Start to Finish
Every joint I cut follows the same loop, and skipping a step is how the scrap pile grows. First, measure the actual stock — plywood and “thicknessed” hardwood lie. Second, design the joint with the corner relief built in, dogbones or T-bones placed so the mating part clears the bit radius. Third, cut a test pair in the same material before committing the real parts — this single habit has saved me more expensive walnut than anything else.
Fourth, lock the workholding to the joint path, not to wherever a clamp happens to fit. Fifth, run the cut with the right bit and a feed that clears chips without burning — a stalled bit in a hardwood joint scorches the glue surface and the burn telegraphs through finish. The CAM strategy behind all of this builds on my roughing toolpath approach and the CAM software I run for setup, with feeds dialed off my feeds and speeds chart. When CNC isn’t the right call for a given jig, my CNC vs 3D print comparison lays out the honest trade, and the same machine that cuts this casework also handles steel fabrication in a hybrid workflow.
The Joinery Kit I Actually Reach For
You do not need a deep shelf to start cutting joinery — you need a few good straight and compression bits, a way to hold thin parts, and a dovetail bit when you graduate to drawers. The pieces I keep within arm’s reach of the machine:
- A 1/4" straight/compression router bit set — the backbone of clean dado, finger, and box-joint cuts.
- A dovetail jig kit for the drawer work where a jig genuinely beats fighting a CNC toolpath.
- A set of low-profile clamping fixtures so the joint path stays clear and the part doesn’t move.
Disclosure: As an Amazon Associate I earn from qualifying purchases. The links above are products I use or recommend; buying through them costs you nothing extra and helps support this site.
Frequently Asked Questions
Can a 3-axis CNC router cut real dovetail joints?
Yes, using a dedicated dovetail bit that flares the cut to create the angled undercut. A standard endmill cannot. Sliding dovetails are easy on a CNC; fine through-dovetails are possible but a dovetail jig is often faster for drawer work.
Why won’t my CNC box joint close fully?
Almost always the leftover corner radius from the bit. An endmill cannot cut a sharp inside corner, so it leaves a radius the mating part binds on. Add dogbone or T-bone fillets in CAM to relieve the corner and the joint drops in flush.
What bit is best for CNC joinery?
Straight-flute and compression bits, not spiral upcuts. A 1/4 inch compression bit gives clean top and bottom edges in plywood; a downcut leaves a glass-clean top face. Match the bit diameter to your smallest internal corner.
Should I cut joints to the nominal plywood thickness?
No. Plywood is almost never its labeled thickness. Measure the actual sheet with calipers and cut dadoes and grooves to that real number, or cut in two passes for an exact fit. Cutting to the label leaves loose, gappy joints.
Is CNC joinery stronger than hand-cut joinery?
Strength comes from joint geometry and glue surface, not the cutting method. A CNC mortise and tenon is as strong as a hand-cut one. The CNC advantage is repeatability and indexing, not raw strength, so the 30th joint matches the first exactly.
Do I need test cuts every time?
For a tight-fitting joint, yes. Cut a test pair in the same material to check the fit allowance before committing real stock. This single habit prevents the most expensive mistakes, since a hair too tight splits on glue-up and a hair too loose shows gaps.
Keep Building
Joinery is one job the router does; here is the surrounding groundwork that makes the joints come out clean:
- CNC Workholding Guide — the single biggest factor in whether a joint cuts true.
- CNC Router Bits Guide — choosing the straight, compression, and V-bits joinery lives on.
- CNC Clamps and Hold-Downs — keeping the joint path clear without the part moving.
- Cutting Hardwood on a CNC — the feeds and finish quality that show on a visible joint.
- CNC Tooling Fundamentals — runout, stick-out, and why bit choice decides corner radius.