Safety first. The following information is for educational purposes. CNC machining involves high-speed rotating cutters. Always wear eye and ear protection, never leave a running machine unattended, and verify all feeds and speeds for your specific setup.
A CNC-cut plywood jig costs roughly $3 in material and machines in 20 minutes with near-zero post-processing. A 3D-printed PETG jig costs $1.50 in filament and prints in 2 hours but needs support removal and dimensional calibration. For one-off workshop jigs where you will use the fixture 5-20 times, 3D printing wins on cost and convenience. For production jigs that will see hundreds of cycles, CNC-cut Baltic birch or HDPE outlasts any FDM print by a factor of 10 or more. The right answer depends on cycle count, not a technology preference — and most workshops that build furniture, cabinetry, or fixtures need both tools for the different jig types they encounter across a single project.
Cost Comparison Per Jig Type
| Jig Type | CNC Material + Time | 3D Print Material + Time | Winner |
|---|---|---|---|
| Drill guide template (6 holes) | $2 ply + 15 min = ~$5 | $1 PETG + 40 min = ~$3 | 3D Print |
| Router template (large, curved) | $4 MDF + 25 min = ~$7 | $3 PETG + 3 hours = ~$10 | CNC |
| Assembly alignment fixture | $6 ply + 30 min = ~$10 | $2 PETG + 90 min = ~$6 | 3D Print |
| Clamping caul (curved pressure) | $3 MDF + 15 min = ~$5 | $4 PETG + 4 hours = ~$15 | CNC |
| Repeatable stop block | $1 scrap + 8 min = ~$2 | $0.50 PETG + 20 min = ~$1.50 | Tie |
| Production fixture (500+ cycles) | $8 HDPE + 40 min = ~$15 | $3 PETG, replace every 50 cycles | CNC |
When 3D Printing Wins
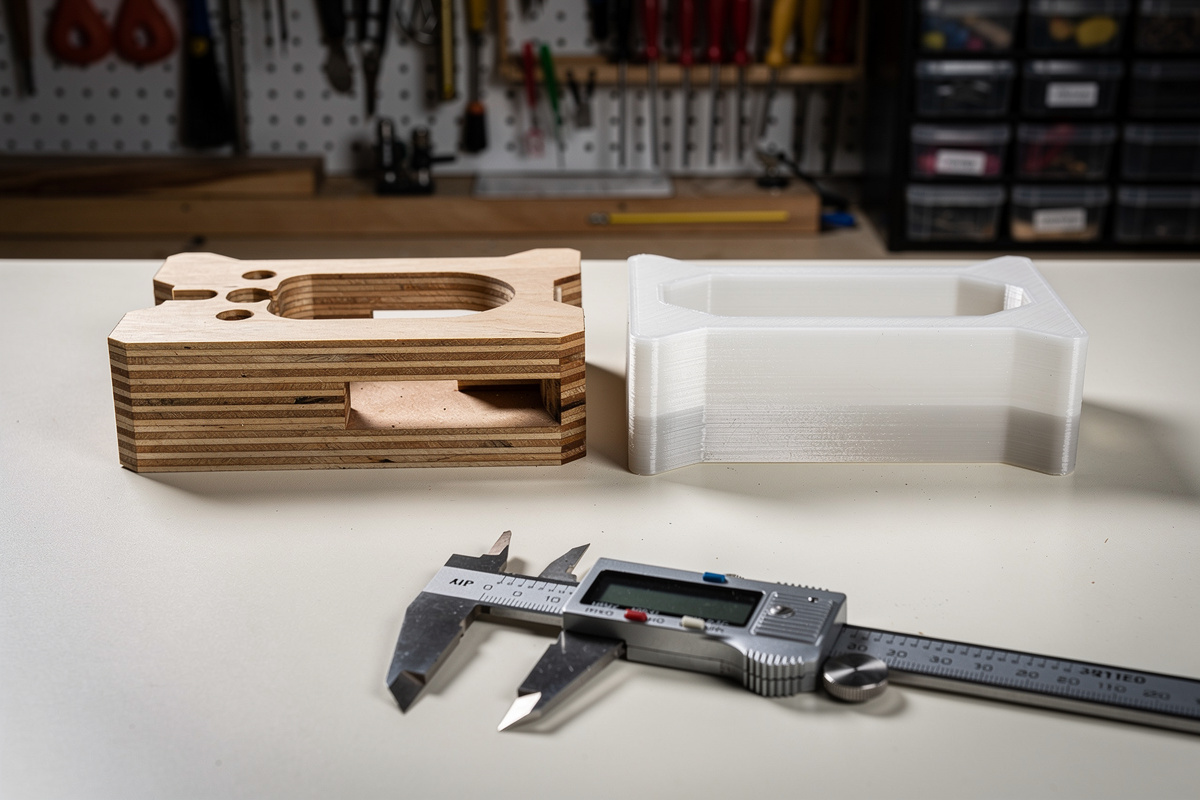
3D printing wins when the jig needs complex 3D geometry that a 2.5D CNC cannot cut — undercuts, hollow channels for vacuum clamping, snap-fit features, or flexure hinges. A drill guide that holds a cylindrical workpiece at a compound angle while providing dust collection channels is a single 3D-print operation versus a multi-part CNC assembly with glue and screws. 3D printing also wins when the jig must be form-fitting around an organic shape — scan the workpiece, model a negative cavity in CAD, and print a perfect-fit holder in one operation. For example, a router template that follows the curved profile of a guitar body is trivial to model and print but requires 3-axis CNC programming with a ball-nose bit and multiple setup changes to machine the same compound curve in plywood.
When CNC Wins
CNC wins when the jig must be flat, dimensionally stable, and abrasion-resistant. A router template that a bearing-guided bit follows for hundreds of linear feet needs the abrasion resistance that plywood or HDPE provides — a PETG template wears visibly after 30-40 passes, and the wear changes the template shape, which cascades into progressively out-of-spec workpieces. CNC also wins any time the jig is larger than a 3D printer’s build volume — a typical desktop CNC has a 300x400mm or larger work area, while most 3D printer beds cap at 250x250mm, and splitting a large jig into glued-together print segments introduces alignment error equal to the printer’s tolerance on each segment junction.
CNC also wins on flatness. An FDM-printed part inevitably has slight warping — PETG warps less than ABS, but a 200mm-long printed jig still has 0.1-0.3mm of lift at the corners due to thermal contraction during cooling. A CNC-cut plywood jig is dead flat to the table surface and stays flat regardless of shop temperature. For any jig where the workpiece references the jig face as a flat plane — an assembly fixture for a cabinet door, a router template for hinge mortises — the 0.1mm of corner lift on a printed jig produces workpieces that rock on a flat assembly table, and that is the kind of error that compounds across multiple glue-ups into a cabinet door that will not close square.
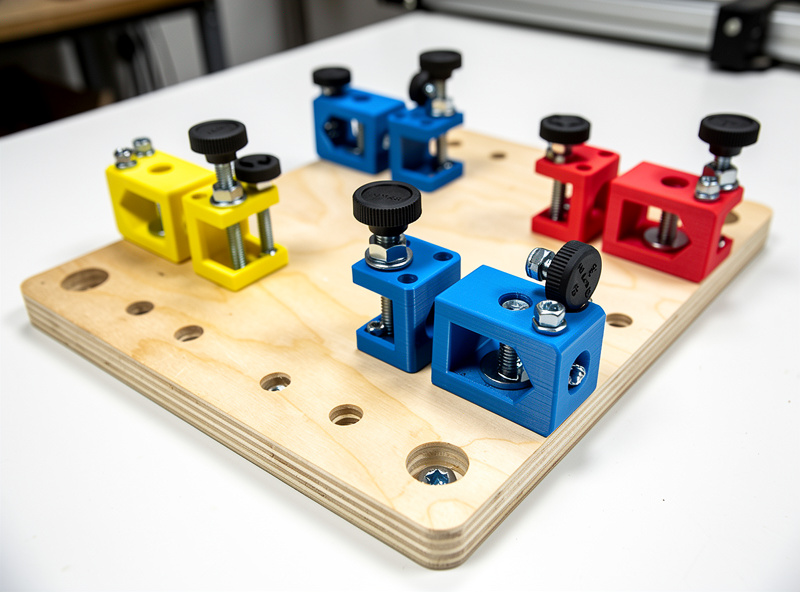
The Hybrid Approach: CNC Base + 3D-Printed Features
The approach I use in my own workshop combines the best of both technologies. The jig starts as a CNC-cut plywood base plate — flat, dimensionally accurate, and threaded for mounting hardware. The 3D-printed components bolt onto this base plate, adding the complex geometry — undercut clamps, vacuum channels, or snap-fit workpiece holders — that the CNC cannot produce. The plywood base provides the reference surface and stability; the printed parts provide the 3D complexity. This hybrid approach costs roughly 30% more in total material than a pure-print jig but lasts 5-10x longer because the high-wear surfaces are plywood and only the low-wear complexity comes from filament.
For selecting the right 3D printing material for workshop fixtures — including when PETG beats PLA, why carbon-fiber-filled filaments improve stiffness for alignment jigs, and how to dial in print settings for functional parts — see the 3D printer filament guide on PrintForgeHQ for the material selection that the CNC-vs-print decision depends on.
Frequently Asked Questions
Which is cheaper for workshop jigs, CNC or 3D printing?
For one-off jigs, 3D printing costs less — approximately $1-3 per jig in filament vs $3-8 for CNC-cut plywood or MDF. For production jigs used hundreds of times, CNC-cut HDPE or Baltic birch outlasts 3D prints by 10x and costs less over the fixture’s lifetime.
Can a 3D-printed jig handle router template wear?
PETG router templates wear visibly after 30-40 passes with a bearing-guided bit, and the cumulative wear changes the template shape. For production routing templates, CNC-cut plywood or HDPE withstands hundreds of passes with negligible dimensional change. 3D-printed templates are fine for one-off or low-volume projects.
What material should I use for CNC-cut jigs?
Baltic birch plywood for general workshop jigs — flat, stable, and holds screw threads. MDF for one-time router templates where you will not reuse them. HDPE (cutting-board plastic) for high-cycle production fixtures — self-lubricating, dimensionally stable, and resistant to glue adhesion.
How do I combine CNC and 3D printing for the same jig?
CNC-cut the flat base plate from plywood for dimensional accuracy, then 3D-print the complex 3D features that bolt onto it — undercut clamps, vacuum channels, or snap-fit workpiece holders. The CNC plate provides the reference surface, and the printed parts add geometry the CNC cannot produce.
What tolerance can I expect from CNC vs 3D-printed jigs?
A calibrated desktop CNC holds +/-0.1mm across a 300mm part. A calibrated FDM printer holds +/-0.2mm but only within 100mm — thermal expansion during long prints adds 0.02mm per 100mm of part length. For jigs over 200mm, CNC accuracy is 2-4x better than FDM.
Is a 3D printer or CNC more useful for a home workshop?
Both serve different jig types. A 3D printer handles complex organic shapes and small one-off fixtures. A CNC handles flat templates, production fixtures, and anything requiring abrasion resistance. A workshop that builds jigs regularly benefits from both — the CNC for reference surfaces and templates, the printer for 3D complexity.
The bottom line is that neither tool is universally better — each excels at the jig types that match its core strengths, and a workshop with both a CNC router and a 3D printer has no jig it cannot produce.