Safety first. The following information is for educational purposes. CNC machining involves high-speed rotating cutters. Always wear eye and ear protection, never leave a running machine unattended, and verify all feeds and speeds for your specific setup.
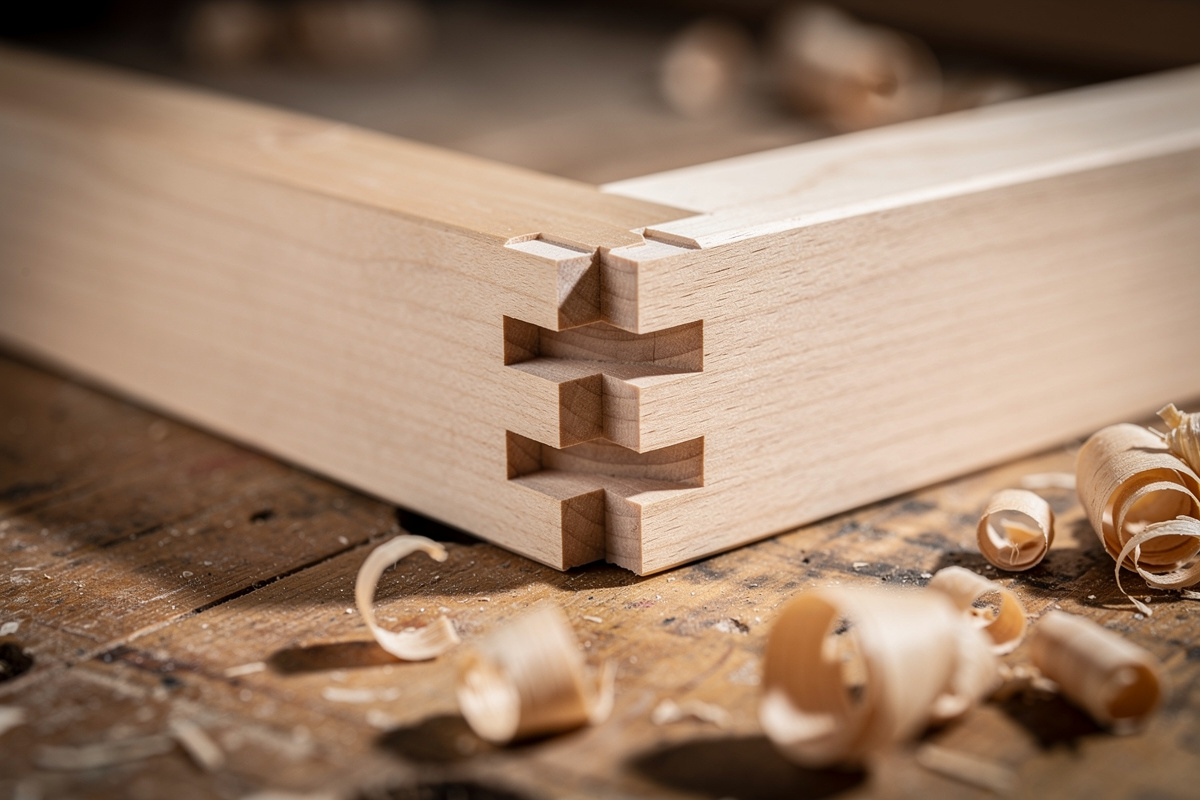
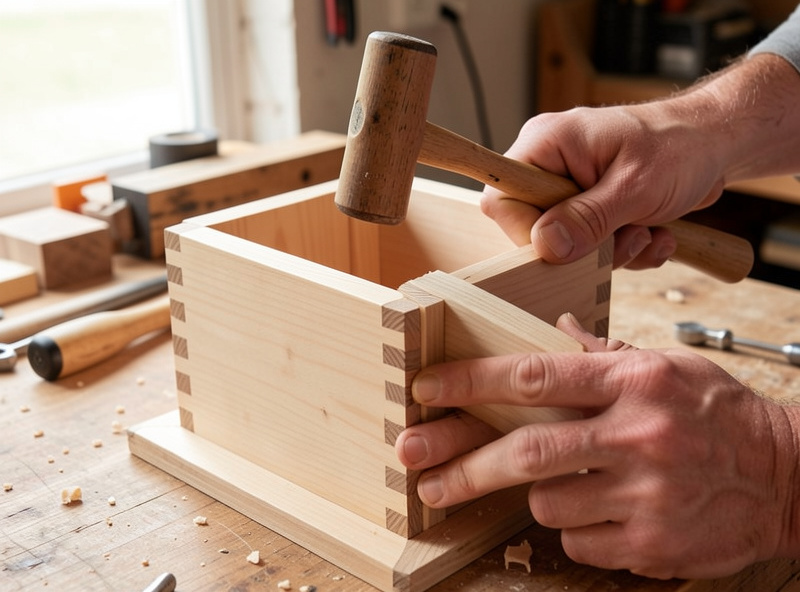
CNC finger joints are interlocking comb-like fingers cut into the ends of two boards so they mesh into a strong, self-registering corner. On my Shapeoko Pro they are the joint I start every beginner on, because the machine does the hard part — perfectly even, repeatable fingers — and the only variable left to dial is the fit. Get the fit allowance right and the joint taps home with a mallet and a film of glue; get it wrong and it either splits on assembly or shows a gap line down the corner. This guide is exactly how I cut them, the fit numbers I start from, and the corner-relief detail that catches almost everyone the first time.
A finger joint gives you enormous glue surface — every finger face is end-grain-adjacent long-grain gluing — and the fingers mechanically locate the parts during glue-up, so the corner squares itself. That self-registration is why I trust it for drawer boxes, small casework, and shop boxes that have to take a beating — the same logic that drives the square-fingered CNC box joint, its closest relative. It is the structural backbone of more of my projects than any other joint, and it lives in the broader family covered in my CNC router joinery guide.
Designing the Finger Joint in CAM
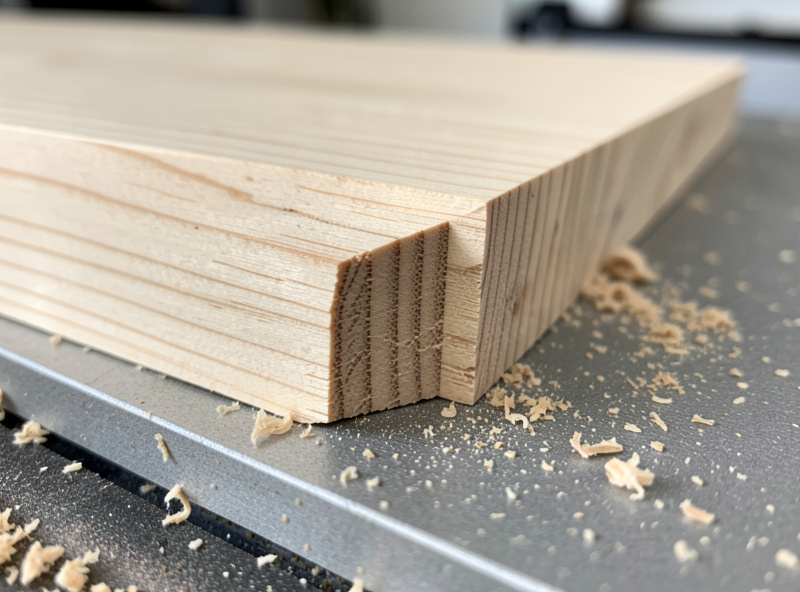
The finger joint is a pattern of alternating slots and fingers, and the only rule that matters is that the fingers on one board are the mirror of the slots on the other. I set the finger width to a clean multiple of my stock width so the joint ends on a full finger, not a sliver — a 150mm board at 10mm fingers gives 15 even fingers, which looks deliberate. A half-finger at the edge is weak and looks like a mistake.
Finger width is a strength-versus-looks call. Narrow fingers look refined and add glue surface but are fussier to fit; wide fingers are stronger per finger and more forgiving but read as chunky. For a 12mm-thick drawer side I run fingers around 8–10mm wide. The finger length equals the mating board’s thickness, so the joint comes flush — I actually cut mine a hair proud and sand flush after glue-up, because a finger cut exactly to thickness sometimes sits a touch low.
The Fit Allowance Is Everything
The single number that decides whether your finger joint succeeds is the fit allowance — how much narrower than nominal you cut the fingers (or how much wider the slots) so the parts assemble. On my machine in hardwood I start at roughly 0.1mm of clearance per mating face and adjust from a test cut. That is a press-to-mallet fit, not a slip fit: I want to seat it with light taps, because end-grain glue joints want intimate contact.
Why a test cut every time? Because the same CAM file fits differently in different wood. Baltic birch ply fuzzes and needs a touch more clearance; dense maple splits if the fit is too tight and wants the allowance honest; MDF is dimensionally stable and forgiving. The wood’s hardness, the bit’s runout, and how recently I trammed the gantry all move the real fit. I cut a two-finger test pair in the actual project stock, check it, then commit. Skipping this is how a box of expensive walnut becomes a box of expensive firewood.
One trap: fit allowance compounds across a multi-finger joint. A tiny per-face error multiplied across fifteen fingers either binds solid or rattles loose, and the box won’t square. The more fingers, the more your test cut and your allowance discipline matter.
Why Finger Joints Need Corner Relief
Here is the detail nobody warns beginners about: a round endmill cannot cut a sharp inside corner. At the base of every slot, the bit leaves a radius equal to half its diameter. The mating finger has square corners, so it lands on that leftover radius and stops short — the joint stands proud and won’t close, no matter how perfect your fit allowance.
The fix is a dogbone or T-bone fillet at the inside corners of each slot, which removes material past the corner so the square finger seats fully. I use T-bone fillets on finger joints because they push the relief into the slot wall rather than diagonally, keeping the relief tucked where it does not weaken the finger root. CAM packages add these automatically once you tell them to — the failure is forgetting to apply relief at all. If your dimensionally perfect finger joint refuses to close, this is the reason 95% of the time. The deeper logic on dogbone versus T-bone is in the main joinery guide, and the same relief thinking applies to the round-cornered pocket in a CNC mortise and tenon.
Bit Choice and Toolpath
I cut finger joints with a straight or downcut bit, not an upcut. The reason is the top edge: an upcut spiral lifts and fuzzes the surface fibers right where the finger meets the show face, and that fuzz reads as a sloppy joint. A downcut presses the fibers down and leaves a glass-clean top edge. For most finger joints I run a 1/8″ or 1/4″ straight bit; the 1/8″ gives a smaller corner radius (less relief needed) at the cost of more passes. My full reasoning on bit direction is in the downcut vs upcut breakdown, and bit selection generally in the router bits guide.
I cut the slots as pockets in multiple depth passes rather than one full-depth plunge — a full-depth cut in hardwood deflects the bit and can taper the slot wall, throwing the fit off top-to-bottom. Two or three passes at a sane depth of cut keep the walls square. I also leave the finishing pass for a light climb cut along the slot wall, which shears the fibers cleaner than a conventional pass.
Holding the Work
Finger joints are cut into the end of a board, which means the board usually stands on edge or sits with its end exposed to the bit — an awkward workholding situation. For boards thick enough I clamp them flat and cut the fingers into the end face with the board lying down, using a sacrificial fence behind the cut so the bit’s exit doesn’t blow out the back edge. That backer is not optional: end-grain exit without support tears out and ruins the last finger.
For thin drawer sides I rely on the same approach but add toe clamps off the joint path and double-check nothing can lift. Workholding is the difference between a clean joint and a part that shifted mid-cut, and it is the first thing I check when a joint comes out wrong. The full toolkit is in my workholding guide, with the clamps and hold-downs I reach for first.
Glue-Up Without Wrecking the Fit
A finger joint has a lot of glue surface and a lot of faces, which means a lot of places for squeeze-out and a lot of friction during assembly. I use a glue with a workable open time, spread it thin on the finger faces only, and assemble with the mallet and a block to avoid bruising the show edges. If the fit is right it goes together with steady taps; if you are fighting it hard, stop — a too-tight finger joint will split the board at the root rather than seat, and you cannot un-split wood.
I clamp lightly across the joint just to close any last gap, not to force a bad fit. Then I check square with a reliable reference before the glue grabs. Because the fingers self-register, a well-cut joint usually pulls itself square; if it won’t, the fit or the relief is off, not the clamps.
The Failure Modes, and What Each One Means
When a finger joint comes out wrong, the symptom tells you the cause. Joint stands proud and won’t close: missing or undersized corner relief — the finger is binding on the radius. Visible gap along the fingers: fit allowance too loose, or the slot walls tapered because you cut too deep per pass. Board split at a finger root on glue-up: fit too tight, especially in a dense or brittle wood — back the allowance off and cut a new test. Torn-out last finger: no sacrificial backer behind the cut, so the bit blew out the unsupported end grain on exit.
Reading the joint this way turns every failure into a single adjustment instead of a guess. I keep a scrap pair of test fingers from each wood I cut, with the working allowance written on it, so the next project in that species starts from a known-good number rather than a fresh round of trial and error. That little library of test pieces is the difference between joinery that feels like luck and joinery that is repeatable.
Frequently Asked Questions
What fit allowance should I use for CNC finger joints?
Start around 0.1mm of clearance per mating face in hardwood and adjust from a test cut. Aim for a mallet-tap fit, not a slip fit. Plywood needs a touch more because it fuzzes; dense hardwood wants the allowance honest to avoid splitting.
Why won’t my CNC finger joint close fully?
Almost always the leftover corner radius. A round endmill cannot cut a sharp inside corner, so the square finger binds on the radius at the slot base. Add T-bone or dogbone fillets to the slot corners in CAM and the finger will seat flush.
What bit is best for finger joints?
A straight or downcut bit, not an upcut. A downcut presses the top fibers down for a clean show edge, while an upcut fuzzes it. A 1/8 inch bit gives a smaller corner radius and needs less relief; a 1/4 inch cuts faster in fewer passes.
How wide should the fingers be?
Set finger width to a clean multiple of the board width so the joint ends on a full finger, never a sliver. For a 12mm drawer side, 8 to 10mm fingers balance strength and looks. Narrower fingers add glue surface but are fussier to fit.
Do I cut finger joints in one pass or several?
Several depth passes, not one full-depth plunge. A full-depth cut in hardwood deflects the bit and tapers the slot wall, throwing off the fit top to bottom. Two or three passes keep the walls square; finish with a light climb pass for a cleaner wall.