Safety first. The following information is for educational purposes. CNC machining involves high-speed rotating cutters. Always wear eye and ear protection, never leave a running machine unattended, and verify all feeds and speeds for your specific setup.
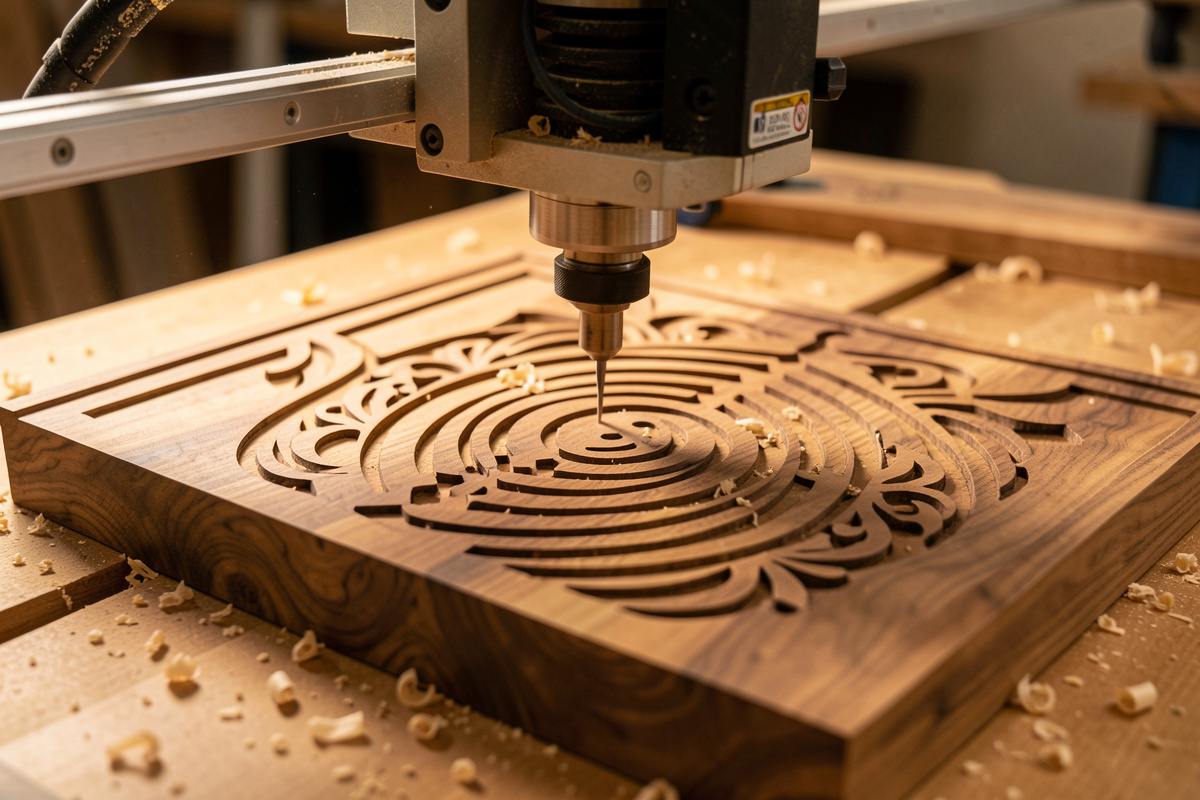
CNC router sign making is the workflow of cutting letters, borders, and graphics into a wood or plastic blank with a spinning bit instead of a hand chisel or a laser. On the machines I run, a clean 12-by-18-inch V-carved sign takes about 25–40 minutes of cut time once the file is dialed, and the part finishes or fails on one thing: whether the blank stayed dead flat and dead still the entire job.
That sentence is the whole site in miniature. People come to sign making for the pretty carved letters and leave frustrated because a corner lifted, the V-bit wandered, or the paint fill bled under masking that never sealed. This guide is the operator’s path through all of it — from picking the blank to scraping the last paint flush — written from the seat of a machine that has cut more spoilboards of practice signs than I want to admit. Every number here is something I dial on my own bench, not a chart I copied from a tool catalog.
What CNC Sign Making Actually Involves
A finished sign is four decisions stacked on top of each other: the blank, the toolpath, the workholding, and the finish. Get the order right and the machine does the easy part. The direct answer most beginners need is that sign making is 70% setup and 30% cutting — the spindle running is the short, quiet part of the job.
The flow I run on every sign is the same regardless of the machine. I lay out the artwork as vectors in VCarve Pro, assign a V-carve or engraving toolpath, set a flat-bottom clearing pass if the letters are wide, pick the bit by the smallest internal corner I need to reach, then post the G-code to match the controller. Before a single chip flies, the blank gets surfaced flat against the spoilboard, zeroed with a touch plate, and clamped or taped so it cannot shift a thousandth. The carving itself is anticlimactic when the setup is right, and that is exactly the goal.
Across the machines I’ve run — a Shapeoko Pro as the daily driver, an Onefinity for its ball-screw rigidity, and a pair of Genmitsu units I keep around to stay honest about what a budget gantry can and cannot do — the sign workflow does not change. What changes is how much the gantry deflects, and that deflection shows up as letter wander long before it shows up anywhere else.
Choosing the Sign Style Before You Touch CAM
The style you pick decides every tool and toolpath after it, so decide it first. There are four sign styles I cut regularly, and each one asks the machine a different question.
V-carved text is the default and the most forgiving. A V-bit plunges deeper to make a letter stroke wider and shallower to make it thinner, so a single 60-degree bit carves an entire alphabet with crisp, sharp inside corners no end mill can reach. It is the technique behind 90% of the rustic and address signs you see, and it is where every sign maker should start. I cover the dialing-in detail in the V-carve text technique guide.
Raised (relief) lettering clears away the background and leaves the letters standing proud. It needs a clearing pass with a flat end mill plus a V-bit or ball-nose for the detail, takes far longer, and eats more material depth. Engraved (flat-bottom) lettering uses a small straight bit to cut letters at a constant depth — clean and modern, but it cannot hit sharp inside corners the way a V-bit can. Dimensional and foam signs use thick HDU or sign foam to carve deep, three-dimensional shapes for outdoor and storefront work, which is its own discipline I break down in the foam sign cutting guide.
The CAM Software That Lays Out Signs
Sign making is a 2.5D job, and the software you pick shapes how fast you go from idea to G-code. For dedicated sign work, VCarve Pro is the tool I reach for first — its V-carve toolpath engine handles text-on-a-curve, inlays, and prismatic carving with controls built specifically for sign makers. The direct answer for anyone choosing software: VCarve for production sign work, Carbide Create for quick free 2D jobs, and Fusion 360 when a sign also needs 3D relief or mechanical features.
What separates a sign-focused package is how it treats letters as vectors you can fine-tune — node editing to fix a font’s awkward serif, weld and offset tools to build a border, and a true V-carve preview that shows where the bit will and will not reach a tight inside corner. I lay artwork out at final size, run the V-carve toolpath, add a separate flat-clearing pass for any letter wider than the bit can fill in one stroke, and simulate before posting. If you are still picking a package, my comparisons of the best CNC CAM software, Carbide Create vs VCarve, and the full VCarve Desktop review walk through exactly which one fits sign work. Whatever you choose, match the right post-processor to your controller or the depths will not land where the preview promised.
The Bits That Cut Signs
Sign work leans on a small, specific shelf of tooling, and the most expensive bit is rarely the right one. For text, the V-bit is king: a 60-degree V-bit gives deeper, sharper character definition for small text, while a 90-degree V-bit clears wider strokes faster and is more forgiving of a slightly off Z-zero. I keep both on the bench and reach for the 60 more often.
For clearing the background on raised signs and for wide letter pockets, I run a 1/4-inch two-flute or a single-flute upcut to evacuate chips fast, then come back with the V-bit for the detail edge. For the cleanest top-and-bottom edges in plywood — which matters when a sign has a routed outside border — a compression bit is the one that leaves no tear-out on either face. Ball-nose bits come out only for 3D relief and textured backgrounds. If you are building the tooling shelf from scratch, my full CNC router bits guide and the V-bit deep dive cover the runout and stick-out details that decide whether a $40 bit out-cuts a $6 one.
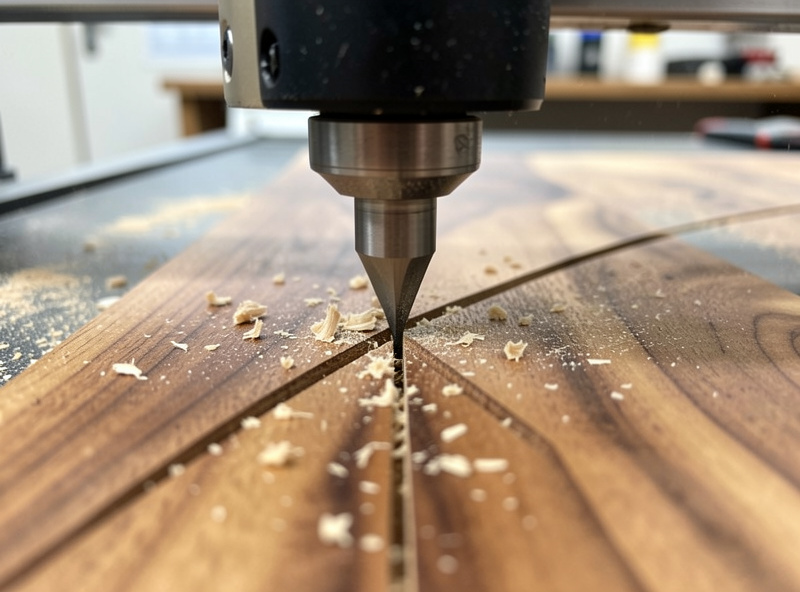
One workshop truth the unboxing videos skip: V-bits dull at the very tip first, and a dulled tip shows up as a fuzzy, rounded letter point — not as a dramatic failure. When your small text suddenly looks soft, the bit is telling you it is done before anything else does. A quality 60-degree V-bit is the single tool I would not cheap out on for sign work — you can find 60-degree V-bits sized for sign work on Amazon.
As an Amazon Associate I earn from qualifying purchases.
Workholding: Why Most Signs Fail Before the First Letter
I will say this on every sign article because it is always true: the blank moving is the number-one cause of ruined signs, not the toolpath. A V-carve toolpath barely loads the gantry, so people get sloppy with workholding and then blame the bit when a letter doubles up. The blank only needs to lift a few thousandths under a clamp for the V-bit to recut a stroke and trash it.
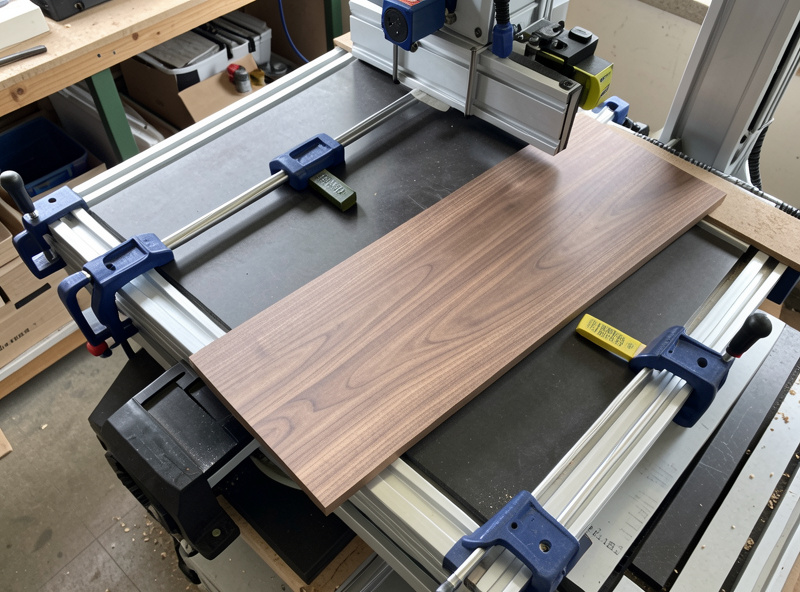
For a flat sign blank, my hierarchy is simple. Low-profile cam clamps and toe clamps on the perimeter handle most rigid hardwood and plywood blanks. For thin sheet stock — acrylic, thin ply, or a sign face under 6mm — double-stick carpet tape across the whole back beats edge clamps because it holds the middle down where a perimeter clamp cannot. For production runs of identical signs, a vacuum table is the upgrade that ended most of my “the part shifted” stories; it holds the entire underside flat with zero clamps in the cutting path. The full decision tree lives in my workholding guide, and the painter’s-tape-and-CA method is the trick for blanks too pretty to put a clamp mark on.
Tramming and Surfacing: The Flat-Sign Prerequisite
Here is the thing nobody tells the new sign maker: a V-carve is only as flat as your spoilboard and only as square as your spindle is trammed. Because a V-bit translates depth into stroke width, any tilt in the spindle or any dip in the bed makes one side of every letter heavier than the other. On a big sign that error is glaring. The fix costs nothing but time — tram the spindle square to the bed with a dial indicator, then surface the spoilboard flat with a surfacing bit so your Z-zero means the same thing across the whole blank.
I resurface my spoilboard whenever I have been cutting through-jobs that nick it, and always before a large sign where letter consistency matters. The blank itself often needs the same treatment — a board off the rack is rarely flat, and a quick surfacing pass on the top face before flipping and carving gives the V-bit a true reference. My wasteboard and surfacing setup covers the flat-and-square foundation, and skipping it is the quiet reason two signs cut from the same file can look different.
Feeds, Speeds, and Letter Depth That Stay Clean
V-carving is a chipload problem disguised as an art project. The bit is a point cutting at a tiny effective diameter near the tip and a much larger diameter up the flute, so the chipload changes constantly through the stroke. I run my 60-degree V-bit in hardwood at roughly 18,000 RPM with a feed around 60–70 inches per minute and a max plunge depth limited in CAM, and I let the software vary the depth — never the operator. The single biggest mistake is letting V-carve depth run unlimited; capping flat-bottom depth at the artwork’s design value keeps wide letters from blowing through a thin blank.
Letter depth is not one number — it scales with letter size and material. For address-plaque text in hardwood I target a flat-depth of about 1.5–3mm; for a large storefront sign in foam the same letter might go 10mm deep for shadow. The depth conversation has enough nuance that I gave it its own routing letter depth guide. The two rules that never change: shallow enough that the blank survives, deep enough that paint fill has a wall to hold. And always conventional-mill the finish pass on a flexy hobby gantry — climb-milling small text on a belt-driven machine invites the chatter that fuzzes your letter edges.
One habit saves more good blanks than any single setting: I proof the file on scrap before I commit an expensive board. The scrap is always the same species I am about to cut, because a clean pass in soft pine proves nothing about how oak will tear at a letter wall. A two-minute test cut catches a flat-depth I forgot to cap, a thin font whose strokes vanished, and a feed that left fuzz, all for the price of a board I was going to surface into spoilboard anyway. On a brand-new design I will also run the toolpath in the air a few millimeters above the blank first, just to confirm the travel limits and tool changes are sane before a single chip flies into a real sign.
Sign Method Comparison
Here is how the four common sign styles stack up on the bench. The “machine demand” column is the one beginners underestimate — a raised sign on a flexy gantry will show its deflection in a way a V-carve never will.
| Sign Style | Main Bit | Cut Time (12×18) | Machine Demand | Best For |
|---|---|---|---|---|
| V-carved text | 60° or 90° V-bit | 25–40 min | Low | Address signs, rustic text, beginners |
| Raised / relief | End mill + V-bit | 60–120 min | High | Premium plaques, business signs |
| Engraved flat-bottom | Small straight bit | 30–50 min | Medium | Modern, uniform-depth text |
| Dimensional foam | Ball-nose + end mill | 45–90 min | Medium | Outdoor, storefront, deep shadow |
Finishing: Paint Fill, Sanding, and Sealing
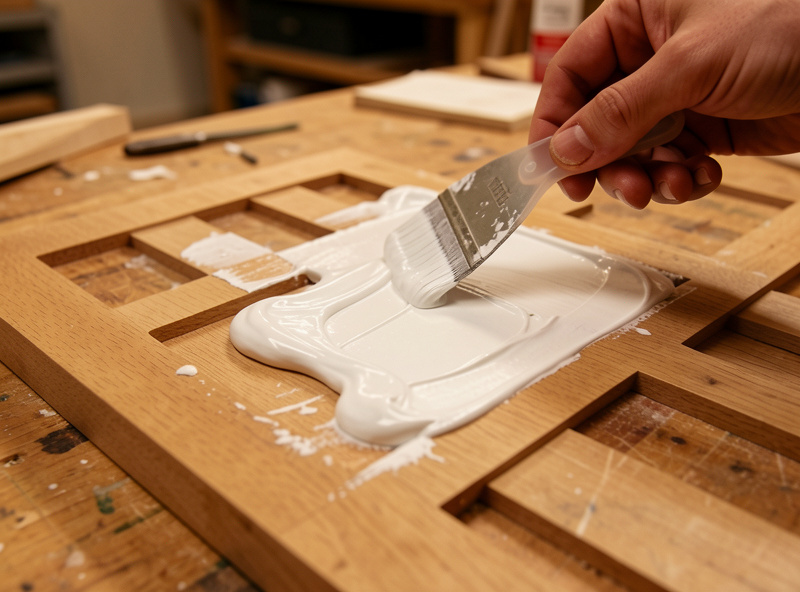
The carve is half the sign; the finish sells it. Paint-filled V-carved letters are the look most customers actually want, and the technique that makes them crisp instead of bled is all about sequence — seal the surface first so paint cannot wick into the wood grain, fill the grooves, then sand the surface paint back flush leaving the recessed letters full. Done in the wrong order, paint bleeds along the grain and the sign looks amateur. I walk the whole sequence, including the masking and sealing tricks, in the paint fill guide.
For outdoor signs, sealing is not optional — an unsealed wood sign cups and greys in a season. I seal end grain heavily, use an exterior-rated finish, and for foam signs prime with a hard coat before paint because raw foam drinks paint and dents under a fingernail. A can of oil-based enamel for paint filling goes a long way across many signs.
Choosing Wood and Material for the Blank
The blank decides how crisp your letters can be. Tight, even-grained hardwoods like maple and cherry hold a sharp V-carve edge; open-grained woods like oak fight you on small text because the grain tears at the letter walls. Cheap construction-grade pine is fine for practice but its soft early-wood and hard late-wood carve at different rates, leaving fuzzy strokes. MDF carves beautifully and paints like a dream but cannot live outdoors. For the full breakdown of which species earn their place on a sign — and which to skip — see my sign blank wood selection guide.
Beyond wood, I cut acrylic and HDPE for modern signs and HDU foam for weatherproof outdoor work. Each behaves differently under the bit — acrylic wants a single-flute O-flute and the right speed to avoid melting, foam wants chip evacuation and a light touch. My acrylic settings and hardwood settings articles carry the specific feeds for each.
Double-Sided Signs and Borders
Once flat signs feel routine, double-sided signs are the natural next step — hanging shop signs, address markers visible from both directions, and bracket signs. The whole game is registration: flipping the blank and having the second side land in perfect alignment with the first. I use indexing pins or a registration fixture and a known flip axis so the back lines up within a hair. It is more fussy than hard, and I lay out the full method in the double-sided routing guide.
From Hobby to Selling Signs
Plenty of people fund their machine by selling signs, and pricing is where most of them leave money on the table by charging for material instead of for setup and design time. The cut is cheap; your CAM time, your finishing labor, and your machine’s amortized bit cost are what you are actually selling. I built a full sign making pricing guide around the real cost structure — material, time, consumables, and the rigidity tax of re-cuts — so you price a sign without resenting it later. And if you are weighing the router against a laser for sign work, my comparison of CNC routing vs laser engraving for signs lays out where each one wins.
Frequently Asked Questions
What CNC machine do I need to make wood signs?
Almost any desktop CNC router can make V-carved signs because the cutting forces are low. A Shapeoko, Onefinity, or even a budget Genmitsu carves clean letters as long as the blank is held flat and the gantry is trammed. Rigidity matters more for raised and aluminum signs than for V-carved text.
What bit is best for carving letters on a CNC?
A 60-degree V-bit is the best all-around choice for sign lettering. It plunges deeper for wider strokes and shallower for thin ones, hitting sharp inside corners no end mill can reach. Use a 90-degree V-bit for larger, bolder text where a wider stroke is wanted.
How deep should I carve sign letters?
For hardwood address-plaque text, a flat depth of about 1.5 to 3mm holds paint fill well. Larger signs and foam can go 6 to 10mm for shadow depth. The rule is shallow enough that the blank survives and deep enough that paint fill has a wall to hold against.
Why are my carved letters fuzzy or torn?
Fuzzy letters usually mean one of three things: a dull V-bit tip, the blank lifting or shifting mid-cut, or open-grained wood like oak tearing at the letter walls. Check the bit tip first, confirm your workholding held flat, and switch to a tight-grained wood like maple for small text.
Can I make signs on a cheap CNC router?
Yes. V-carved signs load the machine very little, so a budget router cuts clean letters if you tram it flat, hold the blank still, and keep the V-bit sharp. The budget machine’s limits show up on raised signs and aluminum, not on basic V-carved wood text.
Should I use CNC routing or a laser for signs?
Route the sign when it needs depth, paint-filled relief, or thick dimensional letters that hold up outdoors. Use a laser when the edge or fine surface detail is the point and the work is shallow. Many sign makers run both and pick per job.
Common Sign-Carving Problems and How I Fix Them
Most sign failures fall into a short list, and each has a specific cause worth knowing before you blame the machine. Double-cut or ghost strokes almost always mean the blank lifted or the Z-zero drifted — re-check workholding and re-zero on the surface, not a clamp. Letters too deep or blown through a thin blank mean the V-carve flat-depth ran unlimited in CAM; cap it to the artwork value. Fuzzy small text is a dull V-bit tip or open-grain wood fighting you. One side of every letter heavier than the other is a tramming problem, not a font problem.
Chatter and a rough finish on long straight strokes is the rigidity tax — a flexy gantry deflecting under load. Slow the feed, take a lighter finish pass, and conventional-mill it. Paint bleeding past the letters traces back to skipping the surface seal before fill. None of these are mysteries once you have hit each one a few times; the deeper troubleshooting flow for chatter, lost steps, and broken bits lives in my desktop CNC troubleshooting guide. Keep a small log of the feeds and depths that worked for each material and your second sign in a given wood is dialed before the spindle even spins.
