Safety first. The following information is for educational purposes. CNC machining involves high-speed rotating cutters. Always wear eye and ear protection, never leave a running machine unattended, and verify all feeds and speeds for your specific setup.
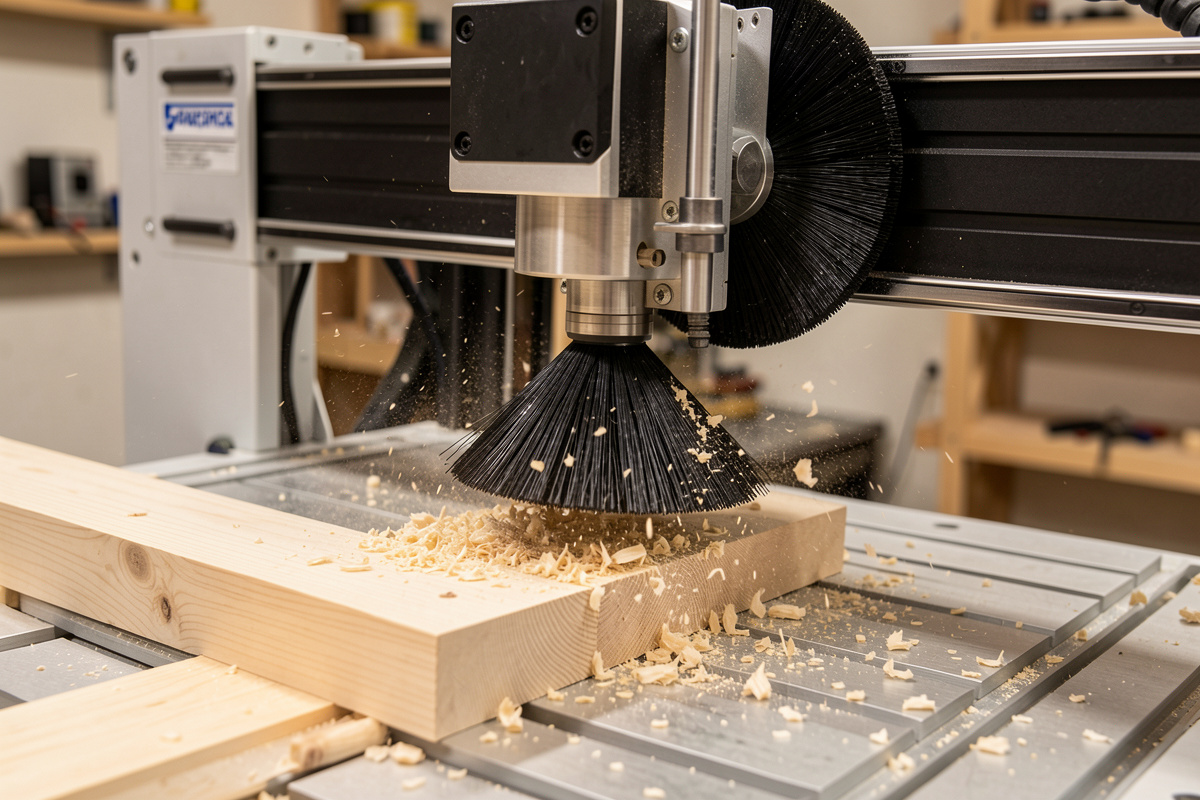
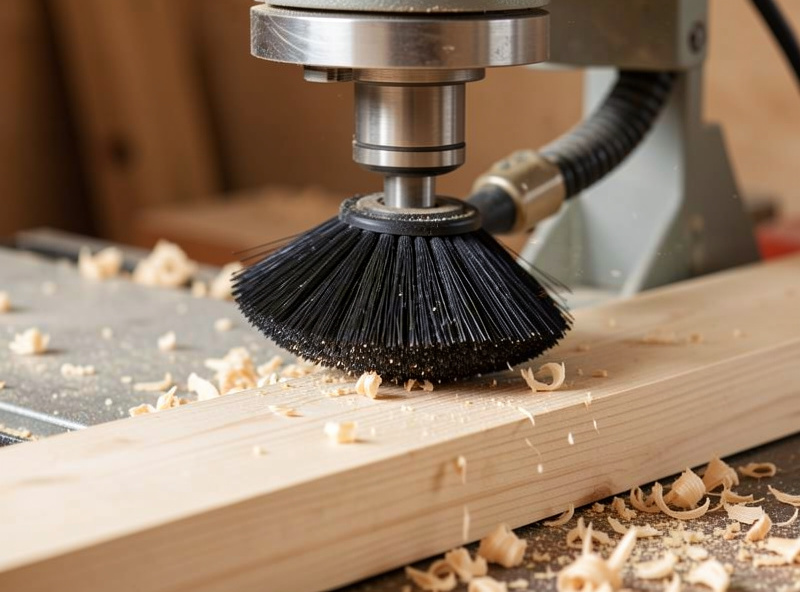
A dust boot looks like the least serious mod on the machine — a little brush skirt clipped around the spindle, sucking up sawdust so you don’t have to vacuum the shop afterward. That framing undersells it badly. On my bench the dust boot stopped being a housekeeping accessory the day I connected the dots between a fuzzy finish, a bit that dulled too fast, and a pile of chips that kept getting recut. The boot isn’t there to keep the shop tidy. It’s there to clear the chips out of the cut while the cut is happening, and that’s a cut-quality and bit-life problem first, a lung-and-broom problem second.
This is the deep dive on the boot itself — the hardware mod, not the whole collection system. Skirt selection and stiffness, sealing to the surface, magnetic versus fixed mounting, why clearing chips protects your finish and your edges, whether to build one or buy one, and how to match the vac port. If you want the broader workshop dust-and-air picture — hose runs, separators, where the dust actually goes — that lives in my safe desktop CNC workshop guide, and I’ll keep this post strictly on the shoe at the end of the spindle.
A quick note: some links below are affiliate links. Buy through one and I may earn a small commission at no extra cost to you. I only point to gear I’d actually bolt to my own spindle — details on my disclaimer page.
Why the Boot Is a Cut-Quality Mod, Not a Cleanup Mod
Here’s the chain of cause and effect that changed how I treat the dust boot. When a cutter throws chips and they stay in the cut path, the next pass of the flute runs back over them. That re-cutting does three bad things at once: it loads the flutes with debris that should have been evacuated, it generates heat the chips were supposed to carry away, and it leaves a rougher surface where the bit chewed swarf instead of slicing fresh material. In wood it shows up as a fuzzy, scorched edge. In plastics it shows up as melted, re-welded strings clinging to the wall. In aluminum, recutting is how you weld chips to the flutes and snap the cutter.
A boot that’s actually pulling air at the cut takes those chips away the instant they’re made. The flutes stay clean, the cut runs cooler, and the finish comes off the way the toolpath intended. I noticed the difference most on long pocketing passes — without good extraction at the tool, the bottom of a deep pocket fills with packed chips and the finish degrades the deeper I go. With the boot sealed and pulling, the pocket floor comes out clean to the last pass. That’s why I file the dust boot under the same heading as feeds and speeds: it’s part of getting chip evacuation right, and chip evacuation is half of cut quality.
Brush Skirt Selection and Stiffness
The brush skirt is the part of the boot that actually does the work, and it’s the part most people get wrong. The skirt’s job is to ride the surface and form a loose seal so the vacuum pulls air down through the brush, across the cut, and up the port — a controlled airflow that carries chips with it. Too sparse or too soft a skirt and the seal leaks, the airflow scatters, and chips spray out the side. Too stiff and the bristles drag, deflect the boot off the surface on uneven stock, and can even mark a soft workpiece.
I run a medium-stiffness nylon brush as my default — dense enough to hold a seal, soft enough to glide over a surfaced spoilboard without dragging. The denser the bristle pack, the better the seal and the better the suction at the cut, so I’d rather have too many bristles than too few. Skirt length matters as much as stiffness: it has to be long enough to maintain contact when the Z axis lifts for the tallest stock you cut, but a skirt that’s far too long flops and loses its seal on thin material. The compromise I’ve settled on is a brush sized for my typical stock height, with a plan to swap it when a job is unusually tall or thin — which brings up the single best feature a boot can have.
Swappable Skirts Are the Feature That Matters
The boot I keep on the machine has a removable skirt ring, and that detail does more for real-world dust control than any other. Brushes wear — the bristles splay and shorten with use, and a worn skirt quietly stops sealing long before it looks worn out. More importantly, no single skirt height is right for every job. A skirt tuned for 18mm ply is too tall for a 3mm acrylic sheet and too short for a 40mm hardwood blank. With a swappable ring I keep two or three skirts on the shelf — a standard one, a short one for thin sheet, and a tall one for thick stock — and change them in seconds instead of fighting one compromise skirt across every material.
If you’re shopping, a replacement CNC dust boot brush skirt is cheap insurance — keep a spare so a splayed, worn brush never costs you a job’s worth of finish. Treat the brush as a consumable, not a permanent part of the machine, and the boot keeps performing for years.
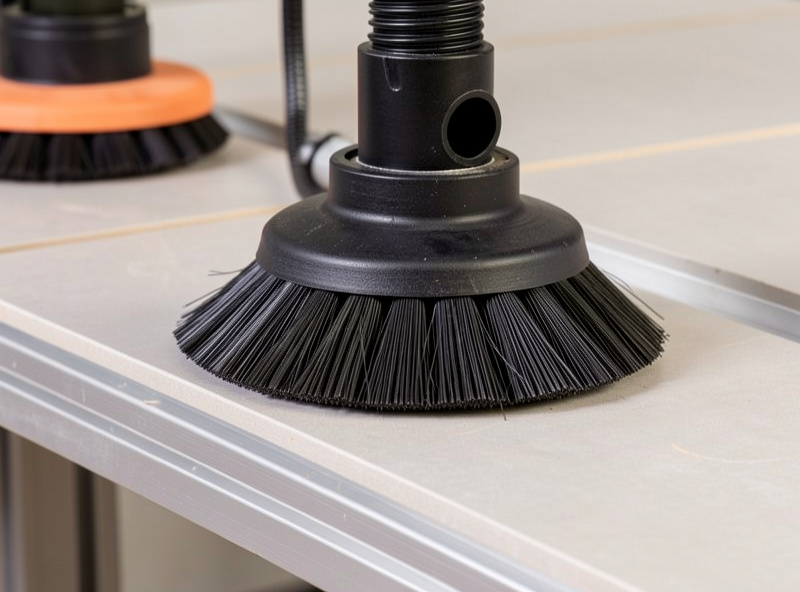
Sealing to the Surface — Where Suction Lives or Dies
A dust boot is only as good as its seal, and the seal is a balance, not a maximum. You want the skirt riding lightly on the surface so air is forced to flow through the brush and across the cut rather than leaking in from the sides. The number-one mistake I see is people lifting the boot too high “so it doesn’t drag,” which breaks the seal and turns a working extractor into a noisy air mover that catches almost nothing. The skirt should kiss the surface with the bristle tips, not hover above it.
The other half of sealing is keeping the boot in light contact as the Z height changes. On a fixed-mount boot bolted to the spindle carriage, the skirt rises and falls with the tool, so it only seals well at one cutting depth unless the skirt is long enough to stay in contact across the range. This is exactly why a floating or spring-loaded boot — one that rides the surface independently of Z height — seals better across varied stock. And it’s why surfacing your spoilboard flat matters here too: a boot can’t seal evenly against a bed that isn’t flat. If your boot won’t seal no matter what you do, that’s also a cue to check the rest of the machine; my desktop CNC troubleshooting guide covers the tramming and spoilboard-flatness checks that quietly sabotage dust control.
Magnetic vs Fixed Mounting
How the boot attaches to the machine decides how often you’ll actually use it — and a boot you take off and leave off is worthless. There are two camps, and I’ve run both.
- Fixed mounting bolts the boot to the spindle mount or gantry carriage. It’s rigid, it never shifts, and it’s the most secure option for heavy cuts. The downside is access: every tool change, every time you want to see the cut or set a Z-zero on the workpiece, you’re working around or unbolting the boot. On a machine where I change bits constantly, that friction is real.
- Magnetic mounting holds the boot on with strong magnets so it pops off in a second for a tool change or a quick look, then snaps back into the same position. This is what I run day to day. The convenience is the whole point — a boot that comes off in one motion is a boot you’ll actually keep on the machine. The trade is that you need genuinely strong magnets, because a weak hold lets the boot creep or drop during a long job.
There’s a third hybrid worth knowing: a boot that mounts fixed to the carriage but has a magnetically-attached front door or skirt ring, so the body stays put for rigidity while the front pops open for tool changes and zeroing. That’s the best of both, and it’s the configuration I’d point a new builder toward. Whatever you choose, the mount has to put the brush concentric with the bit — an off-center boot seals on one side and leaks on the other.
Matching the Vac Hose Port to the Boot
The port on top of the boot is where the airflow leaves, and mismatching it to your vacuum hose is the quiet performance killer. Most desktop dust boots are built around a 2 to 2.5 inch port, sized to pair with a shop vac rather than a big stationary dust extractor — and a shop vac is the right tool here. A shop vac moves air at high velocity through a smaller hose, which is exactly what you want to entrain chips at the cutter; a large low-velocity extractor hose, the kind sized for a table saw, actually moves chips worse at the boot because the air speed drops.
The goal is a smooth, sealed path from the boot port to the vac with no step-downs that choke the flow and no leaks that bleed off suction. If your boot port and your hose don’t match, a shop vac hose adapter for a dust boot bridges the two without a baggy duct-tape joint that leaks air. Keep the hose run as short and straight as the machine allows, support its weight so it doesn’t drag the gantry or pull the boot off-seal, and you’ll get noticeably stronger pull at the cut. Where that hose goes after the vac — the separator, the filter, the air-quality side of things — is the broader dust-collection system, and I’m deliberately leaving it for its own guide rather than half-covering it here.
DIY vs Buy
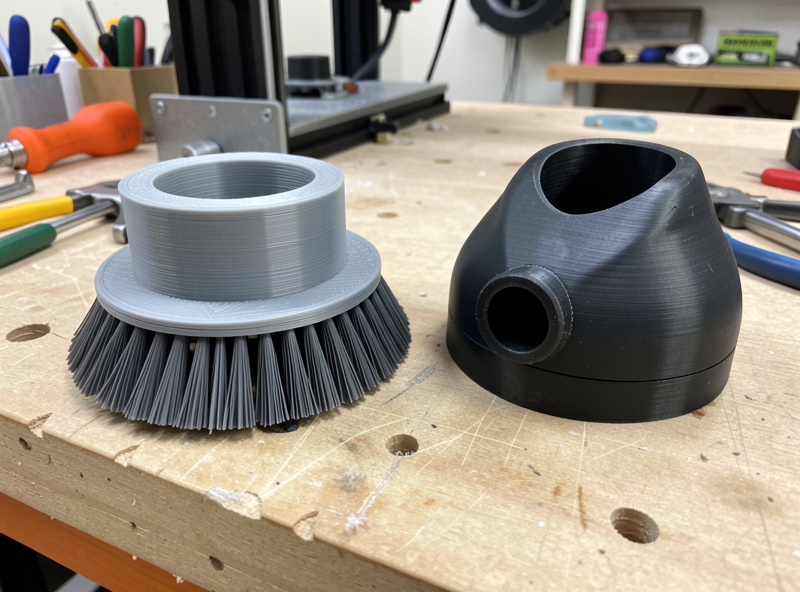
You can absolutely make a dust boot. The classic builds are 3D-printed bodies with a slot for a strip brush, or a shop-made acrylic-and-brush boot, and for a lot of machines a printed boot is a genuinely good answer — it’s cheap, you can tune the geometry to your exact spindle, and you can reprint a worn or cracked part in an afternoon. I’ve printed boots, and the polymath crossover is real: the same workshop that runs the CNC runs the printer that makes its accessories. The hard parts of a DIY boot are getting the brush retained well, getting a clean concentric fit around the spindle, and sourcing a good strip brush — the body is easy, the skirt is the work.
What pushes me toward a bought boot for my daily driver is the engineering around the seal and the mount: a well-designed commercial boot solves concentricity, the magnetic-door tool-change problem, and skirt-swapping in one tidy package that just works. For a Shapeoko, Onefinity, or Genmitsu-class machine, a purpose-built CNC router dust boot shoe sized for your spindle gets you a sealing, tool-change-friendly boot without the iteration. My honest take: print one to learn what you want, then buy the one that nails the seal and the mount if your printed version keeps fighting you. Either way the boot pays for itself in cleaner cuts and longer bit life long before it pays for itself in saved sweeping.
The Boot Behaves Differently by Material
The same boot earns its keep differently depending on what’s under it. Cutting hardwood and ply, the boot’s payoff is finish and a clean shop — fine dust is the enemy, and a sealed boot catches the bulk of it before it coats the machine. With acrylic and plastics, the boot’s job shifts to clearing the stringy, re-melting chips that otherwise pack the cut and weld to the wall; a short skirt that keeps a tight seal on thin sheet matters most here.
Where extraction at the tool stops being optional is aluminum and abrasive composites like carbon fiber. With aluminum I run air or mist at the cutter for chip evacuation and chip welding, and the boot’s brush can interfere with directing that air — so for aluminum I’ll often run a shorter skirt or a dedicated setup and lean harder on the air blast. With carbon fiber the dust is genuinely hazardous and abrasive, and a sealed boot pulling hard is not optional — it’s the difference between contained dust and a workshop full of conductive, lung-damaging fibers. Matching the boot and skirt to the material is the same instinct as matching the bit to the material, and it slots right into the rest of my complete CNC workflow. If you’re still dialing in which cutters pair with which job, the CNC router bits guide and the deeper router bit roundup set that up.
Frequently Asked Questions
Does a CNC dust boot actually improve cut quality?
Yes, and that is its main value beyond cleanup. A sealed boot pulling air at the cut clears chips before the next flute can recut them. Recutting loads the flutes, adds heat, and roughens the finish, so good extraction at the tool means cleaner edges, cooler cuts, and longer bit life.
How stiff should the brush skirt on a dust boot be?
Use a medium-stiffness nylon brush as a default. It needs to be dense enough to hold a seal so air flows through the brush and across the cut, but soft enough to glide over the surface without dragging or deflecting the boot off uneven stock. A denser bristle pack seals and sucks better than a sparse one.
Should I use a magnetic or fixed dust boot mount?
Magnetic mounting pops off in a second for tool changes and Z-zeroing, so you are far more likely to keep the boot on the machine, but it needs strong magnets. Fixed mounting is more rigid for heavy cuts. The best hybrid is a fixed body with a magnetic front door or swappable skirt ring.
What size vacuum hose should I match to a CNC dust boot?
Most desktop boots use a 2 to 2.5 inch port sized for a shop vac. A shop vac moves air at high velocity through a smaller hose, which entrains chips at the cutter better than a large low-velocity extractor hose. Keep the run short and sealed, and use an adapter rather than a leaky taped joint.
Should I 3D print a dust boot or buy one?
A 3D-printed boot is cheap, tunable to your spindle, and reprintable, and is a genuinely good answer for many machines. The hard parts are retaining the brush, getting a concentric fit, and sourcing a good strip brush. A bought boot solves concentricity, magnetic tool-change, and skirt-swapping in one package.