Safety first. The following information is for educational purposes. CNC machining involves high-speed rotating cutters. Always wear eye and ear protection, never leave a running machine unattended, and verify all feeds and speeds for your specific setup.
The first time a loose cable killed a cut on my bench, it wasn’t dramatic — no sparks, no bang. A control wire had drooped just enough to catch a cam clamp on a long X rapid, the gantry dragged it for a few millimeters, the steppers lost steps trying to pull free, and the rest of the toolpath ran a few millimeters off zero from there on. The part was scrap and I spent an hour convinced my steps-per-mm had drifted before I noticed the cable scuff on the clamp. That’s the real argument for a drag chain — not tidiness, but the fact that a snagged wire is a crash, and a crash on a hobby gantry is a broken bit, a ruined workpiece, and sometimes a bent lead screw.
A drag chain (energy chain, cable carrier, cable track — same part, different catalogs) is a hinged plastic carrier that holds your wires and hoses in a controlled loop — including the wiring bundle for Z-axis stepper and limit switches, which benefit most from tidy routing when you upgrade the Z-axis assembly. The CNC Z-axis upgrade guide covers lead-screw and carriage swaps that often change the wire run at the same time. so they bend with the machine instead of flopping wherever gravity and momentum take them. It’s one of the highest-value mods you can make to a desktop CNC, and it’s cheap. This is how I size, route, and mount one so it actually prevents crashes rather than just looking neat — and how it fits into the broader job of keeping a safe desktop CNC workshop.
A quick note: some links below are affiliate links. Buy through one and I may earn a small commission at no extra cost to you. I only point to gear I’ve actually mounted on my own machine — details on my disclaimer page.
Loose Cables Are a Crash Waiting to Happen
People sell drag chains on cable management, and that undersells them badly. The failure mode that matters is mechanical: an unmanaged cable bundle has slack that moves, and on a CNC the gantry sweeps that slack across the work envelope hundreds of times per job. Sooner or later a loop dips into the path of a clamp, a workpiece edge, the spoilboard, or the gantry itself. Properly installed limit switches are what stop a runaway axis from going past its travel — the CNC limit switches and homing guide covers switch placement and the homing cycle that sets machine coordinates correctly. When it snags, one of two things happens — the cable yanks the moving axis off its commanded position (lost steps, ruined part, and every cut after it is wrong), or the connector takes the strain and the wire fatigues at the solder joint until it fails intermittently weeks later. Both are crashes, just on different timescales.
There’s a second, quieter failure too: a cable that flexes randomly at the same spot every cycle work-hardens and cracks the conductor strands inside the insulation. That’s the source of a lot of “my limit switch triggers randomly” and “the spindle cuts out mid-cut” gremlins that send people chasing controller bugs. A drag chain fixes both problems at once — it constrains where the bundle is allowed to bend and keeps that bend gentle and repeatable, so nothing snags and nothing fatigues. If you’ve been fighting intermittent faults, the troubleshooting path almost always loops back to wiring, which is why I treat cable carriers as a reliability upgrade, not décor — and why they show up in my desktop CNC troubleshooting guide.
Sizing the Chain to Your Wire and Hose Bundle
Sizing is where most first installs go wrong, in both directions. Too small and you can’t fit the bundle without cramming it, which defeats the point — packed wires can’t move independently and they chafe. Too large and the chain is heavy, adds inertia to the axis, and on a light belt-driven machine that mass actually costs you a little accuracy and acceleration headroom. The goal is the smallest cross-section that holds everything with room to breathe.
Here’s how I size mine. First, gather the actual bundle you’ll be carrying and measure it — every wire that crosses the axis, plus any hose. On a typical desktop build that’s stepper motor wires, limit/homing switch wires, the spindle or router power, and often a thin air line for chip clearing. Lay them flat side by side and measure width and height, then add roughly 20 percent so the chain’s inner cavity isn’t packed solid. Match that to the carrier’s stated inner dimensions, not its outer size — the catalog “15×30” style numbers refer to the usable cavity. The two dimensions I actually check before buying:
- Inner width and height — must clear your bundle plus ~20 percent, measured laid flat, not bunched into a circle.
- Inner bend radius — must be larger than the tightest bend rating of any cable or hose inside it (more on this below); the chain is useless if it bends your wires tighter than they tolerate.
- Length — half your axis travel plus the fixed-end run to the controller, plus a little, because you can always shorten a link-style chain but you can’t add links you didn’t buy.
For most desktop machines a small-to-medium openable carrier handles the whole bundle. I like the openable (clip-along-one-side) style because you can lay wires in and snap the lid rather than threading everything through a closed tube — a huge time saver when you inevitably add a wire later. A basic CNC drag chain cable carrier kit with end brackets included is the right starting point — buy a length longer than you think you need.
Inner Bend Radius: The Spec That Protects Your Wires
The single most important spec on a drag chain is its inner bend radius — the radius of the curved loop the chain forms as it folds back on itself. Every cable and hose has a minimum bend radius below which the conductor or the hose wall starts to fatigue; flex it tighter than that, repeatedly, and it fails. The chain must bend looser (larger radius) than the worst-rated thing inside it. Shielded cable and air hose are usually the limiting factors — they tolerate the least bending.
The rule of thumb I use: the chain’s bend radius should be at least seven to ten times the diameter of the thickest cable in the bundle, and never tighter than any cable’s stated minimum. Most link-style carriers come in a few fixed bend-radius options for the same cross-section, so you pick the one that’s loose enough. Erring loose costs you a little extra loop height and that’s all — erring tight costs you a dead cable in a few months of cutting. When in doubt, go to the next larger radius. This is exactly the kind of detail the cheap “tidy your wires” framing skips, and it’s the difference between a chain that prevents failures and one that quietly causes them.
Mounting Brackets and Service Loops
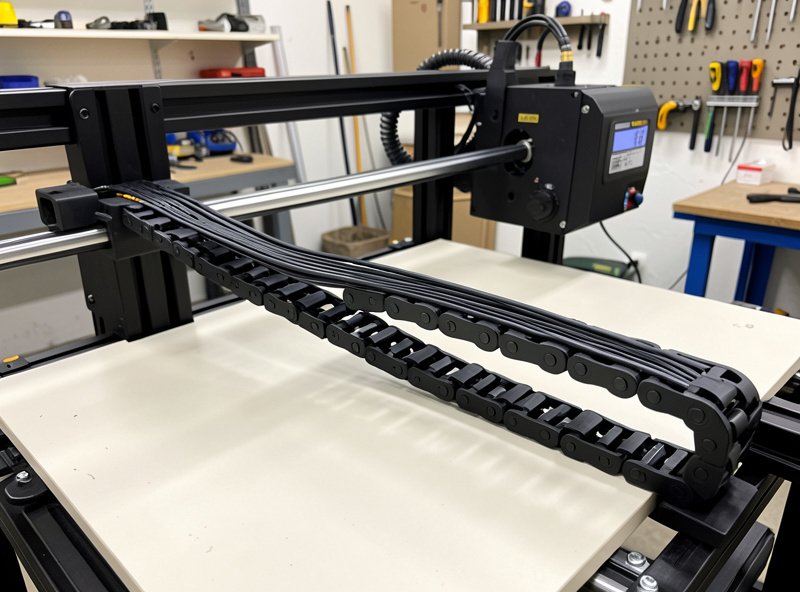
A drag chain has two ends, each with a different job. The fixed end mounts to the machine frame near the controller, where the cables exit toward the electronics. The moving end mounts to the carriage or gantry it travels with. Both need a solid bracket — the small molded or aluminum end connectors that anchor the chain and provide the strain relief so the wires aren’t taking load at the connector. Skip the brackets and zip-tie the chain to the frame, and the chain itself starts walking around, which puts you back where you started.
Get the mounting geometry right and the loop forms cleanly in the gap between the two ends. The bracket positions set where the loop lives, so plan it so the loop has clearance to fold and unfold through the full axis travel without hitting the frame, the workpiece, or itself. On most desktop machines the X-axis chain rides along the back of the gantry and the loop hangs below or behind, well clear of the cutting area. A set of proper cable carrier mounting brackets in the right size for your chain makes this a ten-minute job instead of an improvised mess.
The detail that separates a good install from a flawless one is service loops. At each end, leave a little extra wire — a gentle loop of slack between where the cable enters the chain and where it terminates at the motor or controller. That slack means the connection isn’t under tension at the extremes of travel, so the strain relief in the bracket does its job and the solder joints never see load. I leave enough at the moving end that the carriage can reach its hard limit without pulling anything taut, and a matching loop at the fixed end. It costs a few centimeters of wire and saves the connectors that fail first.
Keep Power and Signal Wires Apart
Inside the chain, what you put next to what matters. The spindle or router power cable carries a switching load — especially a VFD spindle, which throws electrical noise — and running a delicate signal wire pressed against it is asking for interference. The classic symptom is a homing switch or probe that triggers falsely, or an inductive sensor that gets twitchy, only when the spindle is running. The same principle applies to touch probes — shielded wiring routed in its own chain segment prevents the spindle noise that causes false Z-zero triggers. The CNC touch probe guide covers wiring and noise-rejection best practices.. The current in the power cable couples noise into the parallel signal line.
The fix is physical separation. In a wider chain I run power down one side and signal (limit switches, probe, touch plate) down the other, with as much gap between them as the cavity allows. Where they have to cross, cross them at a right angle rather than running parallel. Shielded cable for the signal lines helps, with the shield grounded at one end only. On the VFD spindle I run on my Shapeoko Pro, keeping the spindle power physically separated from the homing wires inside the carrier cleaned a flaky limit switch into a dead-reliable one. If your chain is too narrow to separate them well, that’s a sign to size up — or to route the spindle power in its own small chain or sleeve and keep the signal chain clean. To bundle and protect groups within the chain, a length of wire loom and braided sleeving kit keeps the power group and the signal group tidy and identifiable as separate bundles.
Routing the Dust Hose: With the Chain or Separate
The dust collection hose is the one decision people agonize over, and the answer is: usually separate. A 2.5-inch shop-vac hose is bulky and stiff, and forcing it into the drag chain means buying a much larger, heavier, more expensive carrier just to swallow it — mass you don’t want on a light gantry. I run the dust hose on its own overhead support instead: a boom arm, a bungee from the ceiling, or a simple gantry-mounted hoop that lets the hose follow the spindle from above without dragging on the work or fighting the chain. Good chip evacuation is part of cut quality, not just cleanliness, so the hose has to move freely with the head — but it doesn’t have to share the chain.
The exception is a thin air line for chip clearing or mist on aluminum — that’s flexible and small, and it belongs inside the chain with the wires, where it’s protected and follows the same controlled path. So my rule is: thin air line in the chain, bulky dust hose on its own overhead support. If you genuinely want everything in one carrier, there are oversized cable-and-hose chains made for it, but on a desktop machine the weight penalty rarely justifies it. The cleaner your dust pickup and wiring routing, the fewer surprises mid-job — it’s the same discipline that runs through my complete CNC workflow.
A Quick Pre-Cut Install Checklist
Before I call a drag-chain install done and run a real job, I walk through a short list — the same way I’d dry-run a toolpath against my clamps:
- Bundle fits the cavity with room to move, not crammed solid.
- Chain bend radius is looser than every cable’s and hose’s minimum.
- Both end brackets are solidly mounted to frame and carriage — no zip-tie shortcuts.
- Service loops at each end; nothing goes taut at the hard limits.
- Power and signal separated inside the chain; crossings at right angles.
- Loop has full clearance through the entire axis travel — jog the axis end to end by hand, watching the loop.
- Dust hose moves freely with the head and never dips into the cut.
The hand-jog at the end is the one I never skip. Move each axis slowly through its full travel and watch the chain fold and the loop swing — it’s the same instinct as air-cutting above a part to confirm the gantry clears the clamps. Five minutes of jogging by hand catches the snag that would otherwise show up as a lost-steps crash on a four-hour job. A drag chain is a small, cheap mod, but it removes one of the few remaining ways a desktop CNC can sabotage itself mid-cut — and on a machine where rigidity and workholding are the things you actually fight, taking wiring crashes off the table for twenty dollars is one of the easiest wins there is. It’s the kind of upgrade I’d do before the second crash, not after — right alongside the basics on any desktop CNC machine worth owning in 2026.
Frequently Asked Questions
Do I really need a drag chain on a desktop CNC?
Yes, if you care about reliability. Loose cables snag clamps and workpieces and pull the gantry off course, which causes lost steps and ruined parts, and they fatigue at the same flex point until a wire fails intermittently. A drag chain constrains where the bundle bends so nothing snags and nothing work-hardens. It is one of the cheapest reliability mods you can make.
How do I size a drag chain for my machine?
Lay every wire and any thin air line flat side by side, measure the bundle width and height, and add about 20 percent so the cavity is not packed solid. Match that to the carrier inner dimensions, not its outer size. For length, take roughly half your axis travel plus the fixed run to the controller, and buy a little long since you can shorten a link chain but not extend it.
What bend radius should a CNC cable carrier have?
The chain bend radius must be looser than the minimum bend radius of every cable and hose inside it, with shielded cable and air hose usually being the limiting factors. A safe rule is at least seven to ten times the diameter of the thickest cable. When choosing between radius options, err larger. A tight radius fatigues conductors and causes failures within months.
Should the dust hose go inside the drag chain?
Usually no. A bulky 2.5 inch shop-vac hose forces you into a much larger, heavier carrier, adding mass to a light gantry. Run the dust hose on its own overhead support such as a boom arm or ceiling bungee instead. A thin air line for chip clearing is the exception and belongs inside the chain with the wires.
Why do my limit switches trigger randomly after wiring?
Most often it is electrical noise from the spindle or router power cable running parallel to the signal wires inside the bundle. Separate power and signal onto opposite sides of the chain, cross them at right angles where they must meet, and use shielded cable for signals grounded at one end. A VFD spindle is the worst offender and benefits most from physical separation.